




Class 6 Vocational Education Kaushal Bodh Chapter 4 Animation and Games is the project where most students get stuck on the same step: which Scratch block group does which job. The handwritten notes below write out all eight block groups, the Sprite and backdrop words, the storyboard card and every activity, in the 2026-27 Kaushal Bodh order.
- Length: 30 handwritten pages covering Activity 1 to Activity 11 in the book's own order.
- Must-learn part: the eight block groups, Motion, Looks, Sound, Events, Control, Sensing, Operators and Variables.
- Also on this page: a quick recall table, a five point mistake list and links to the other chapter resources.
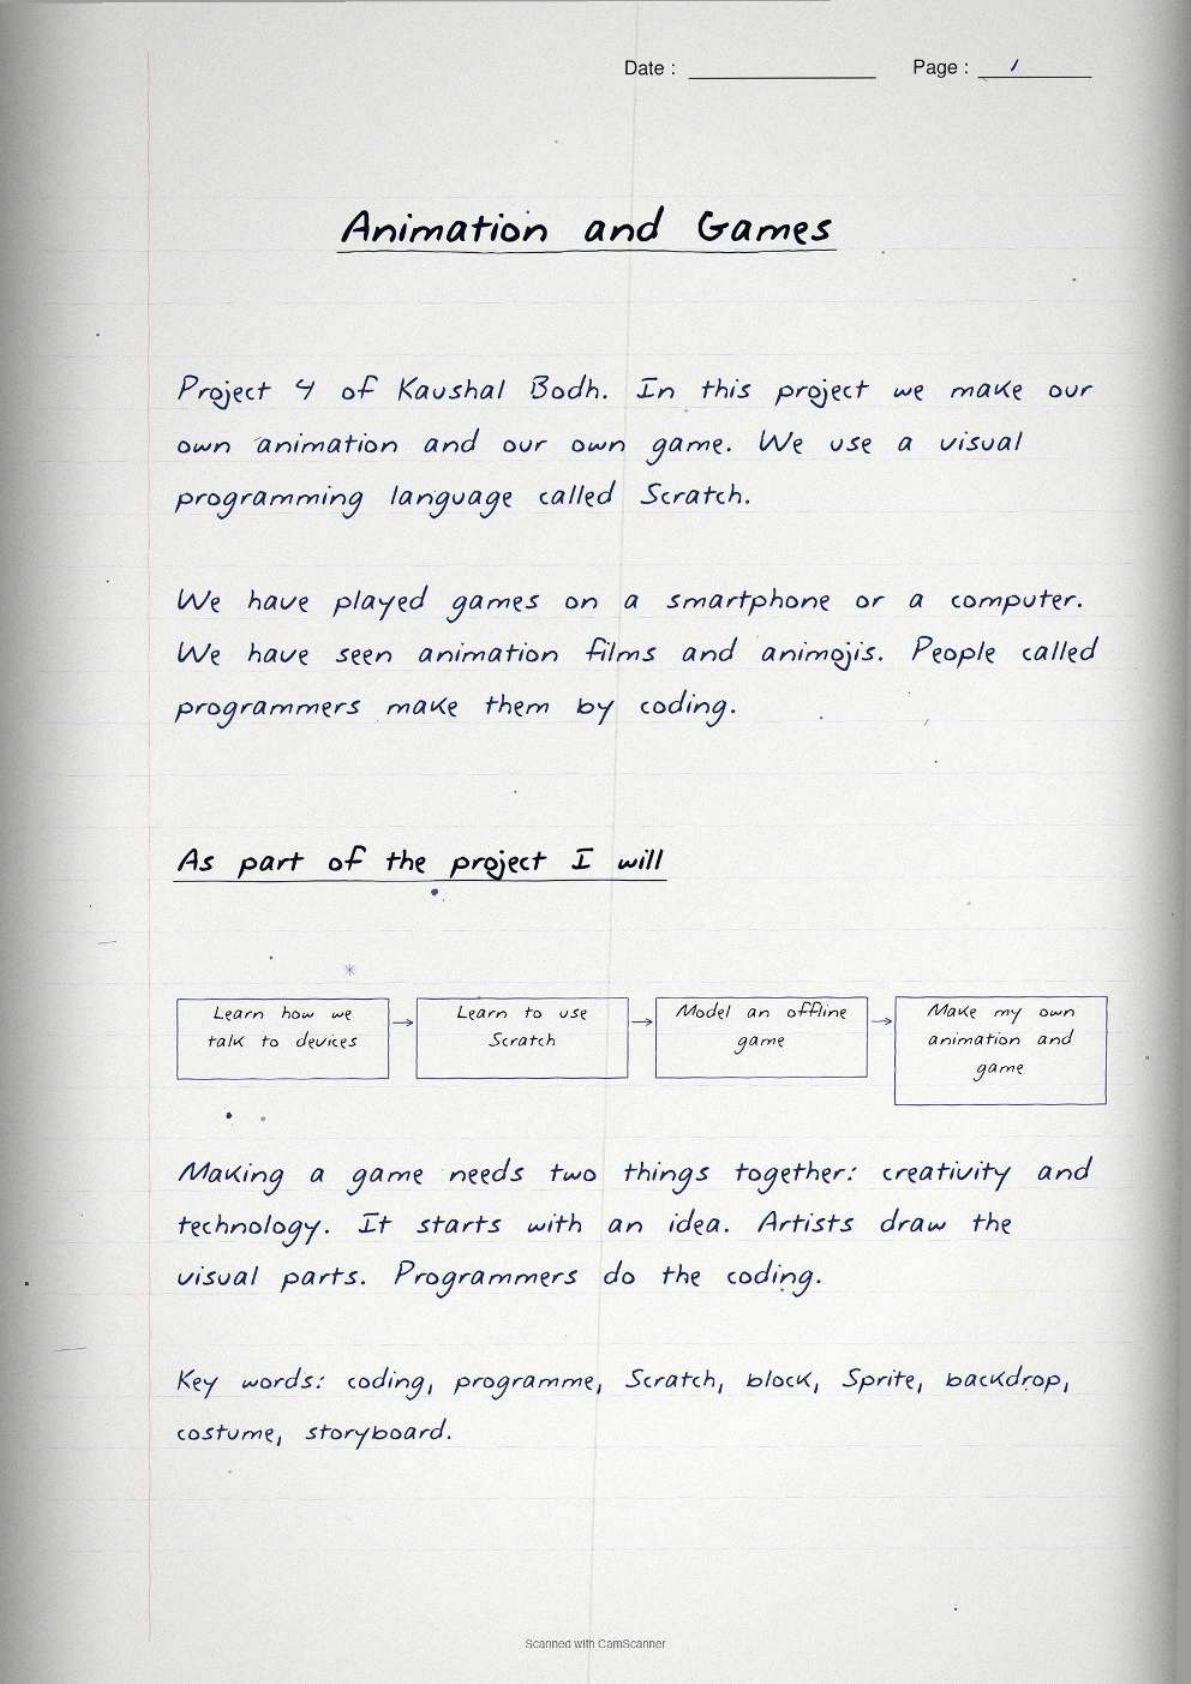
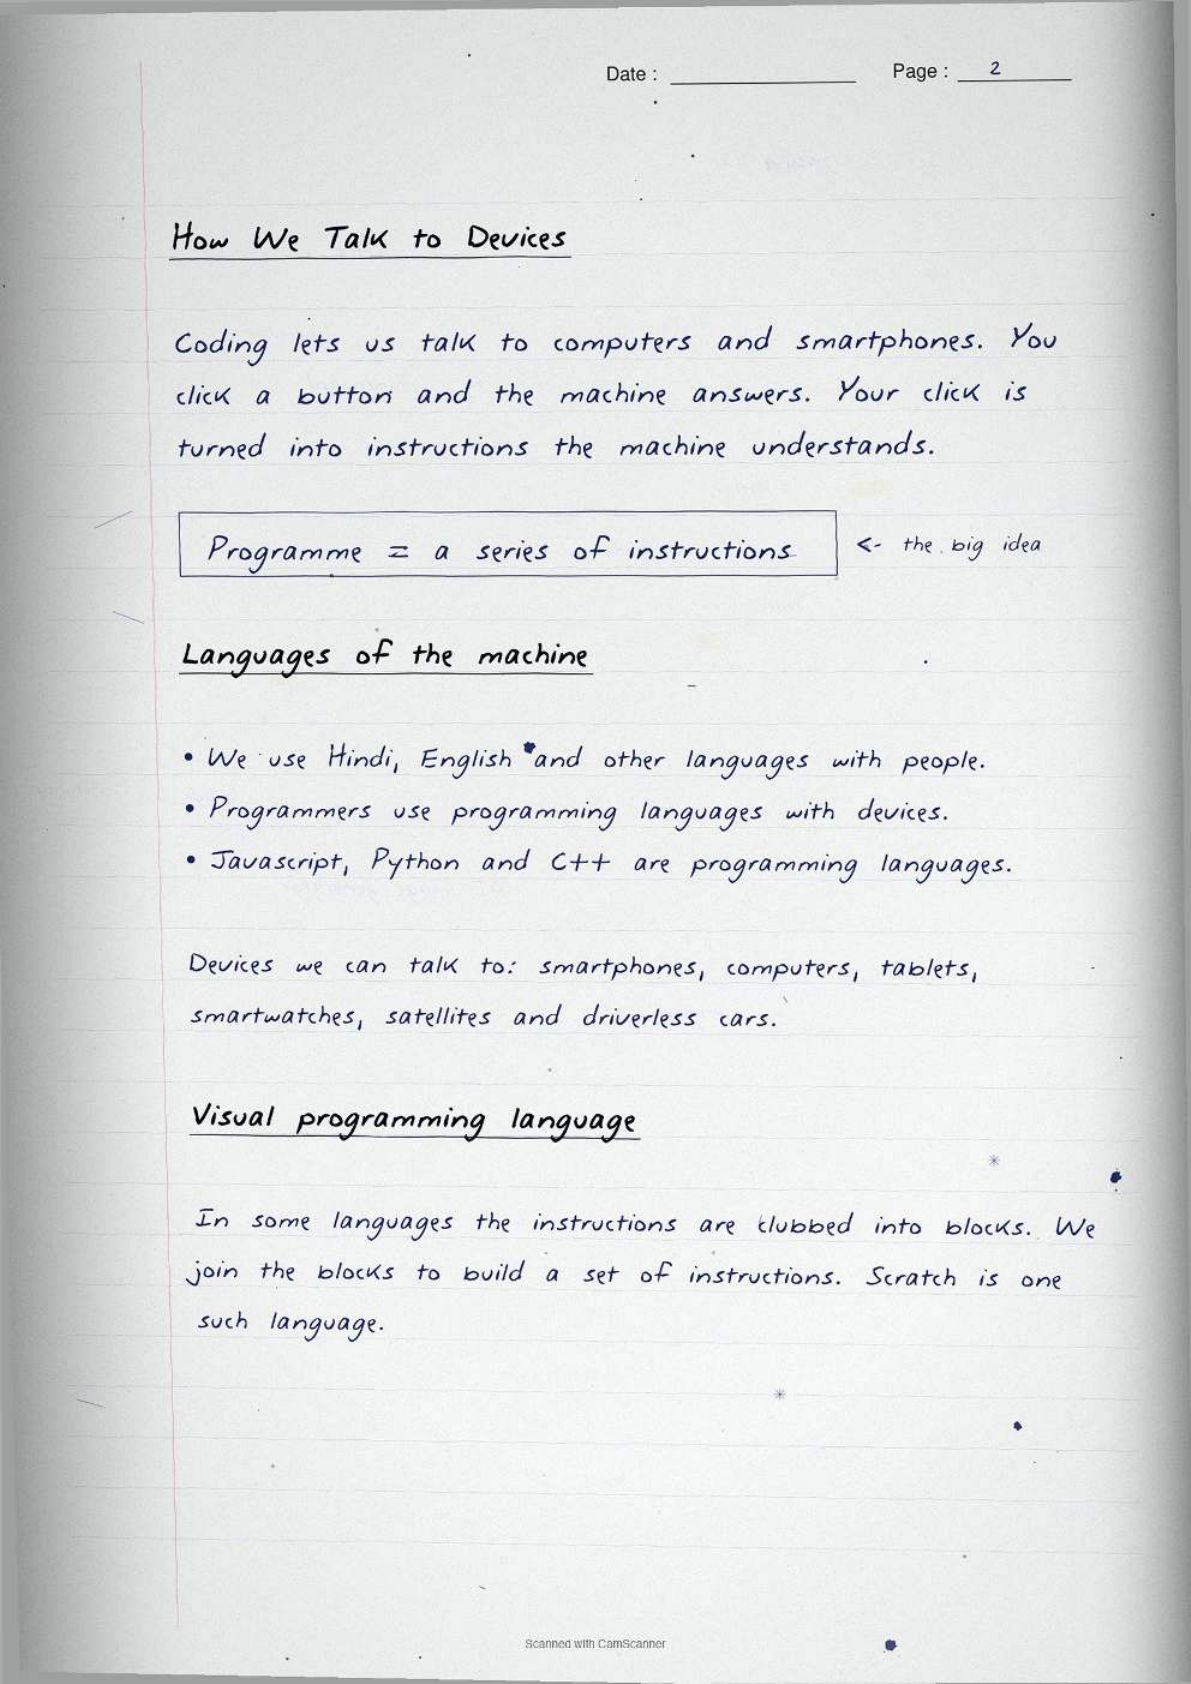
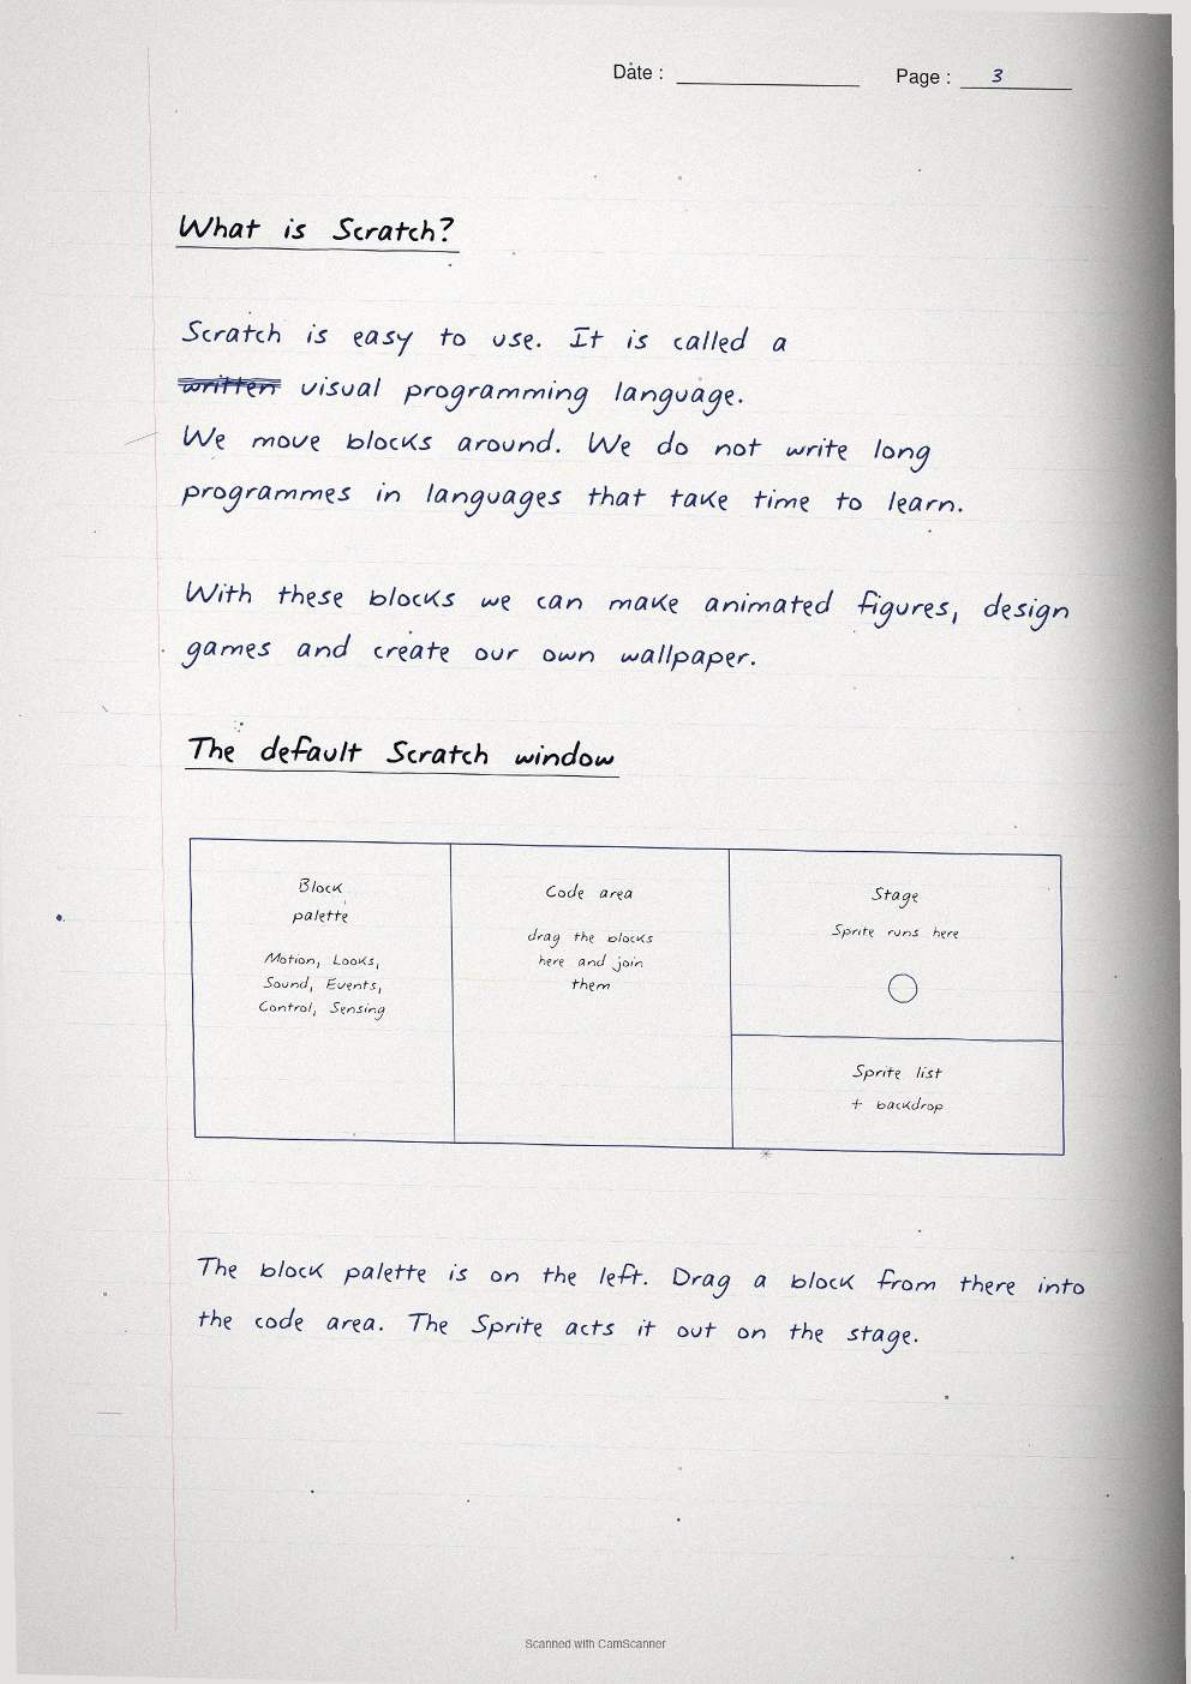
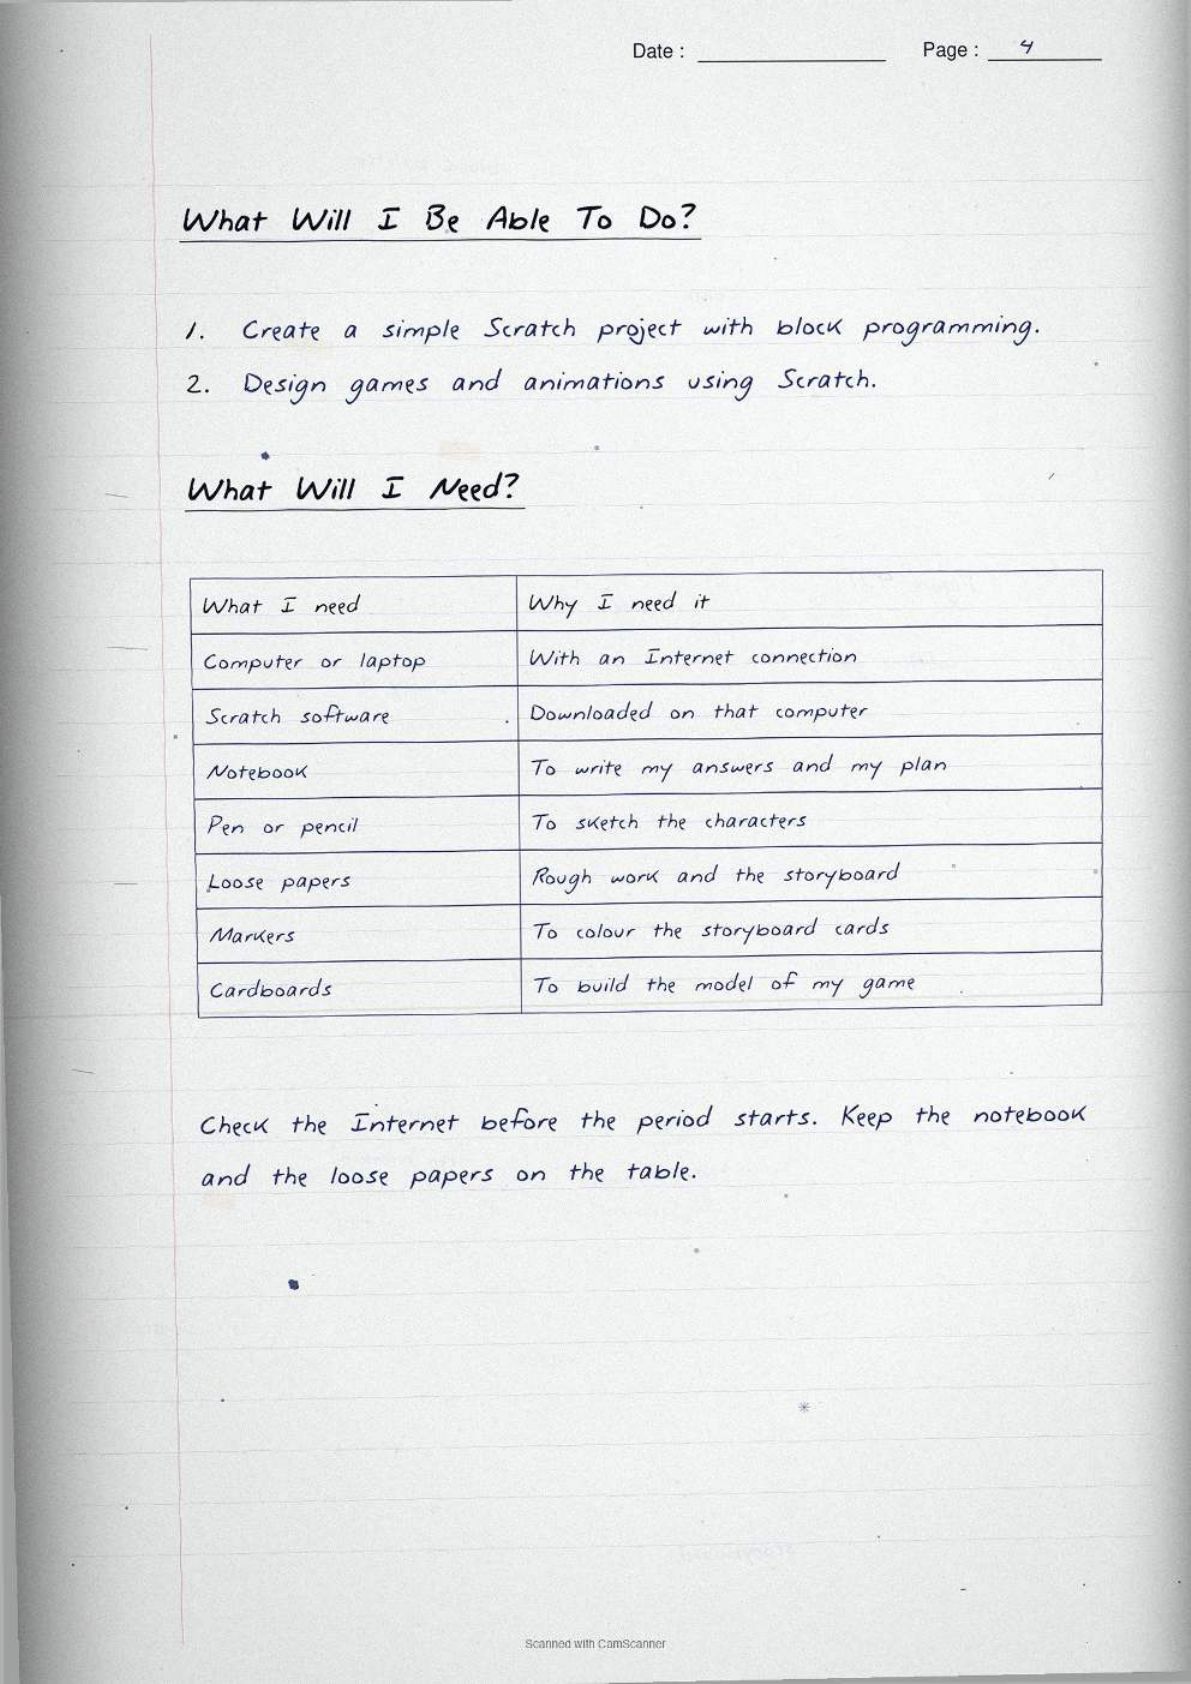
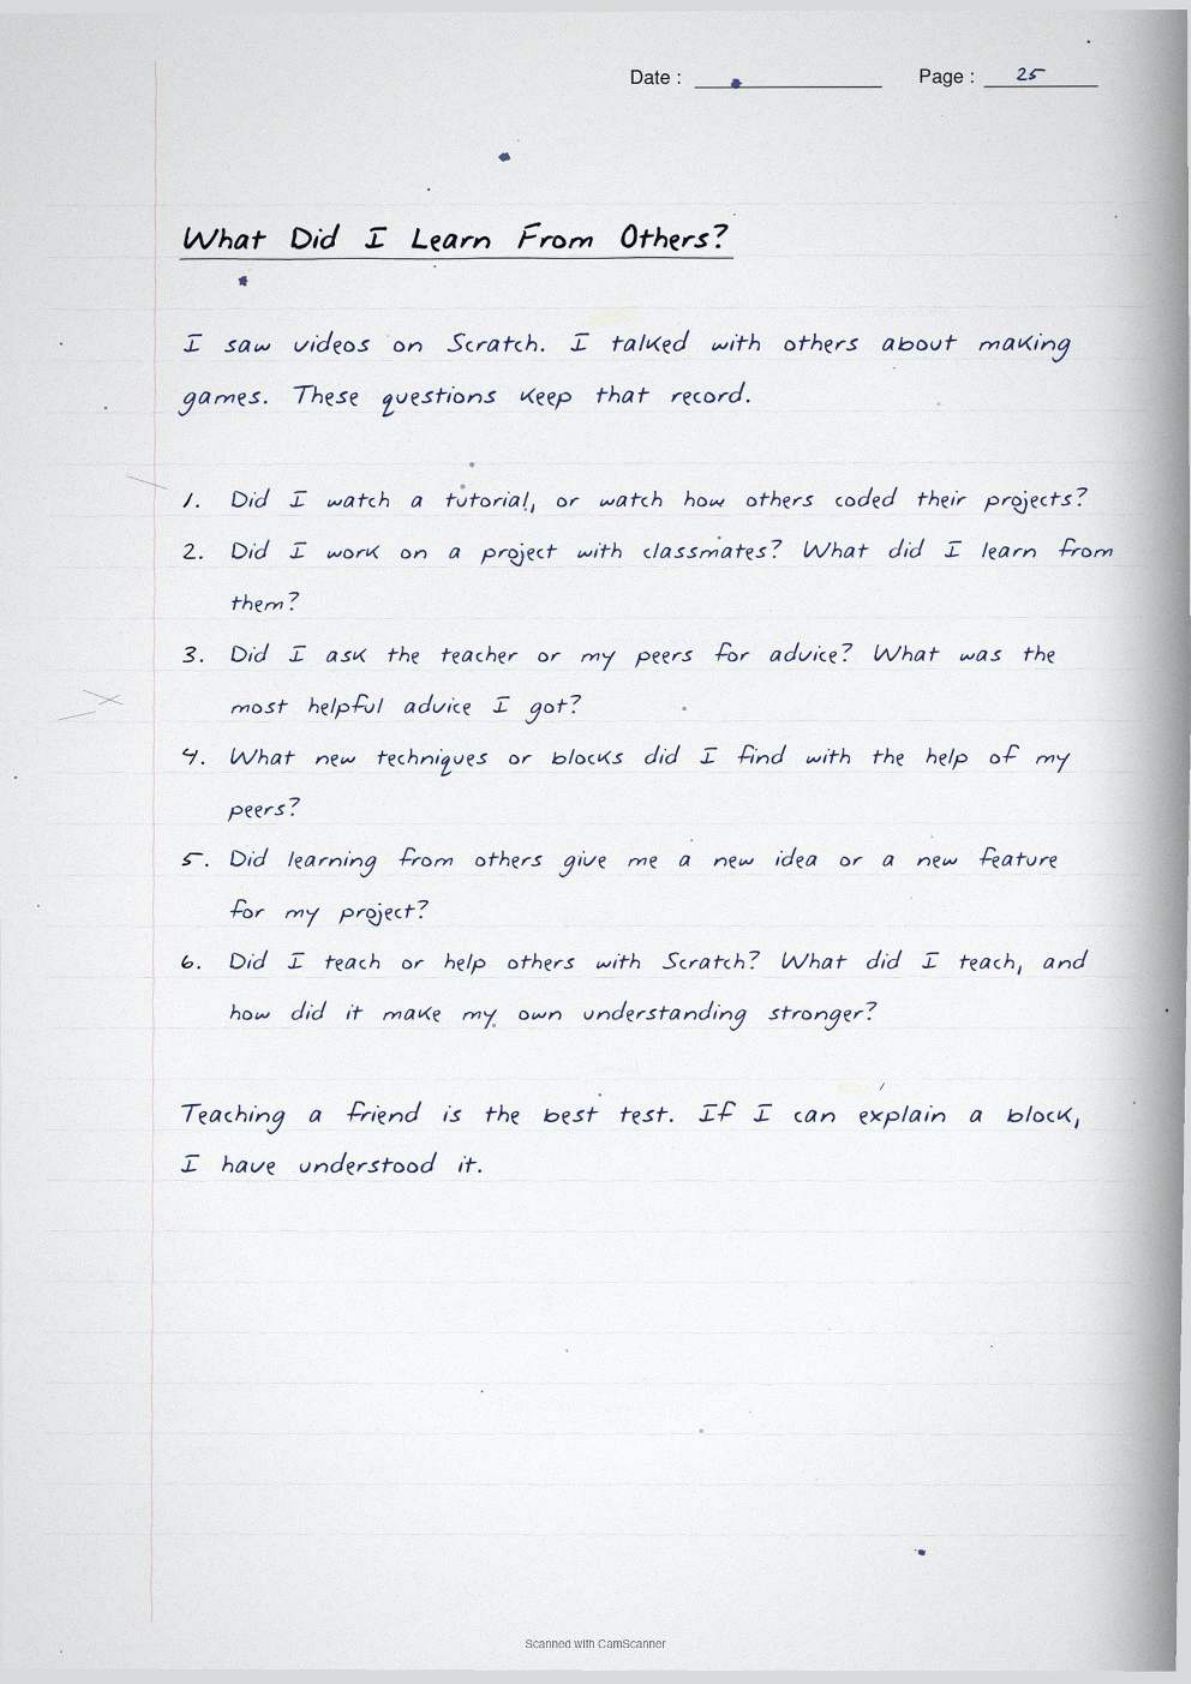
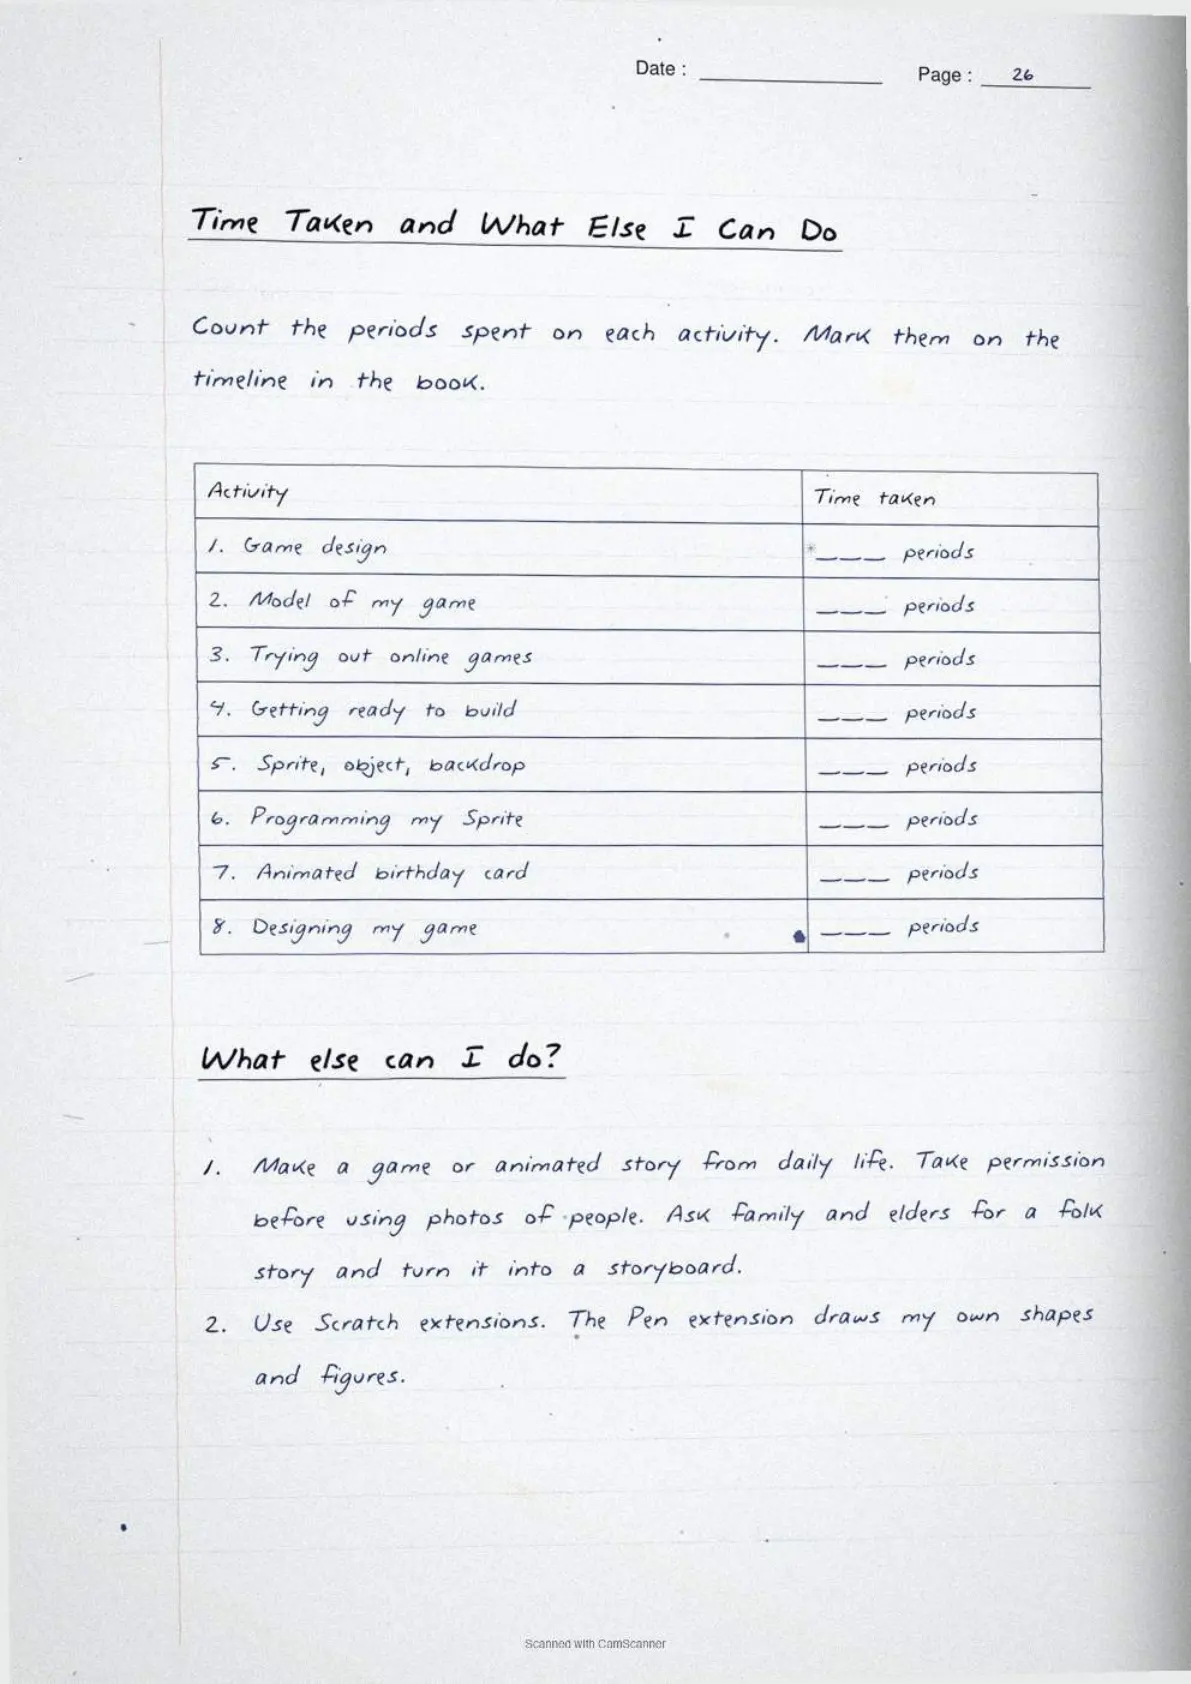
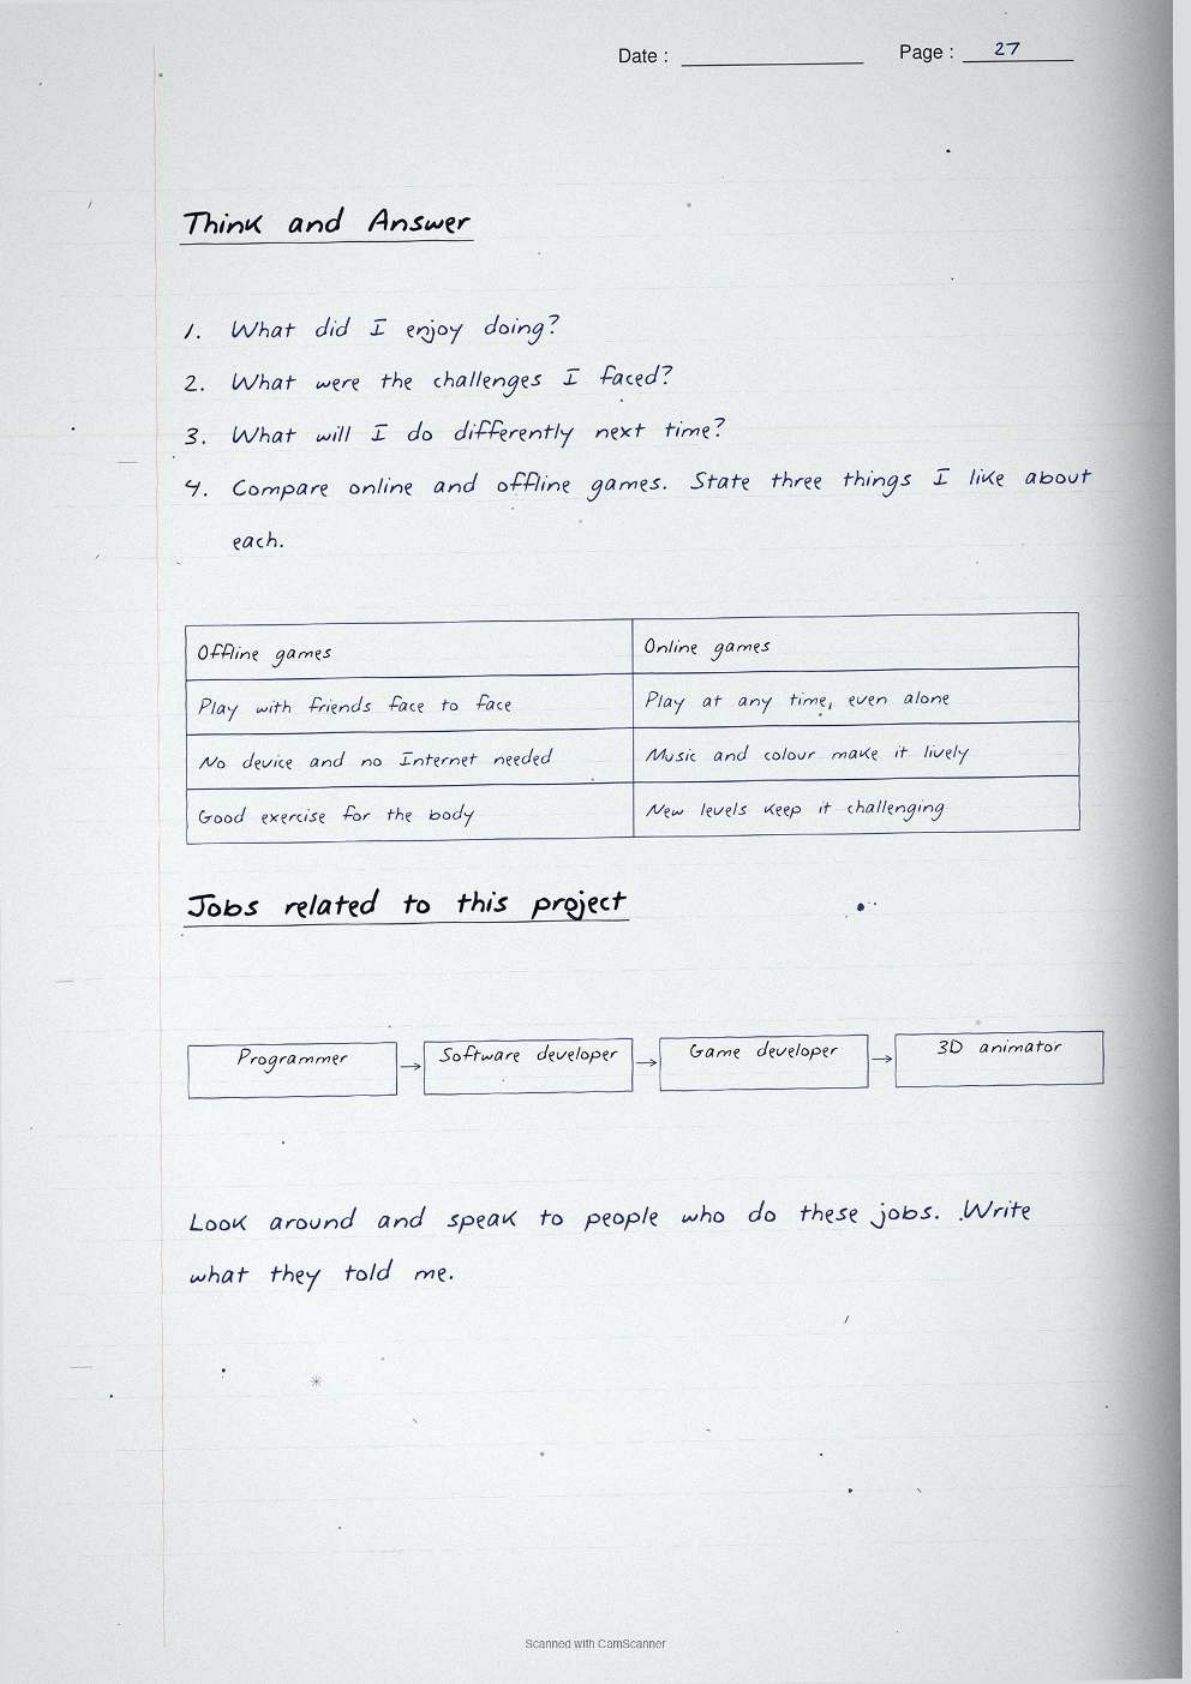
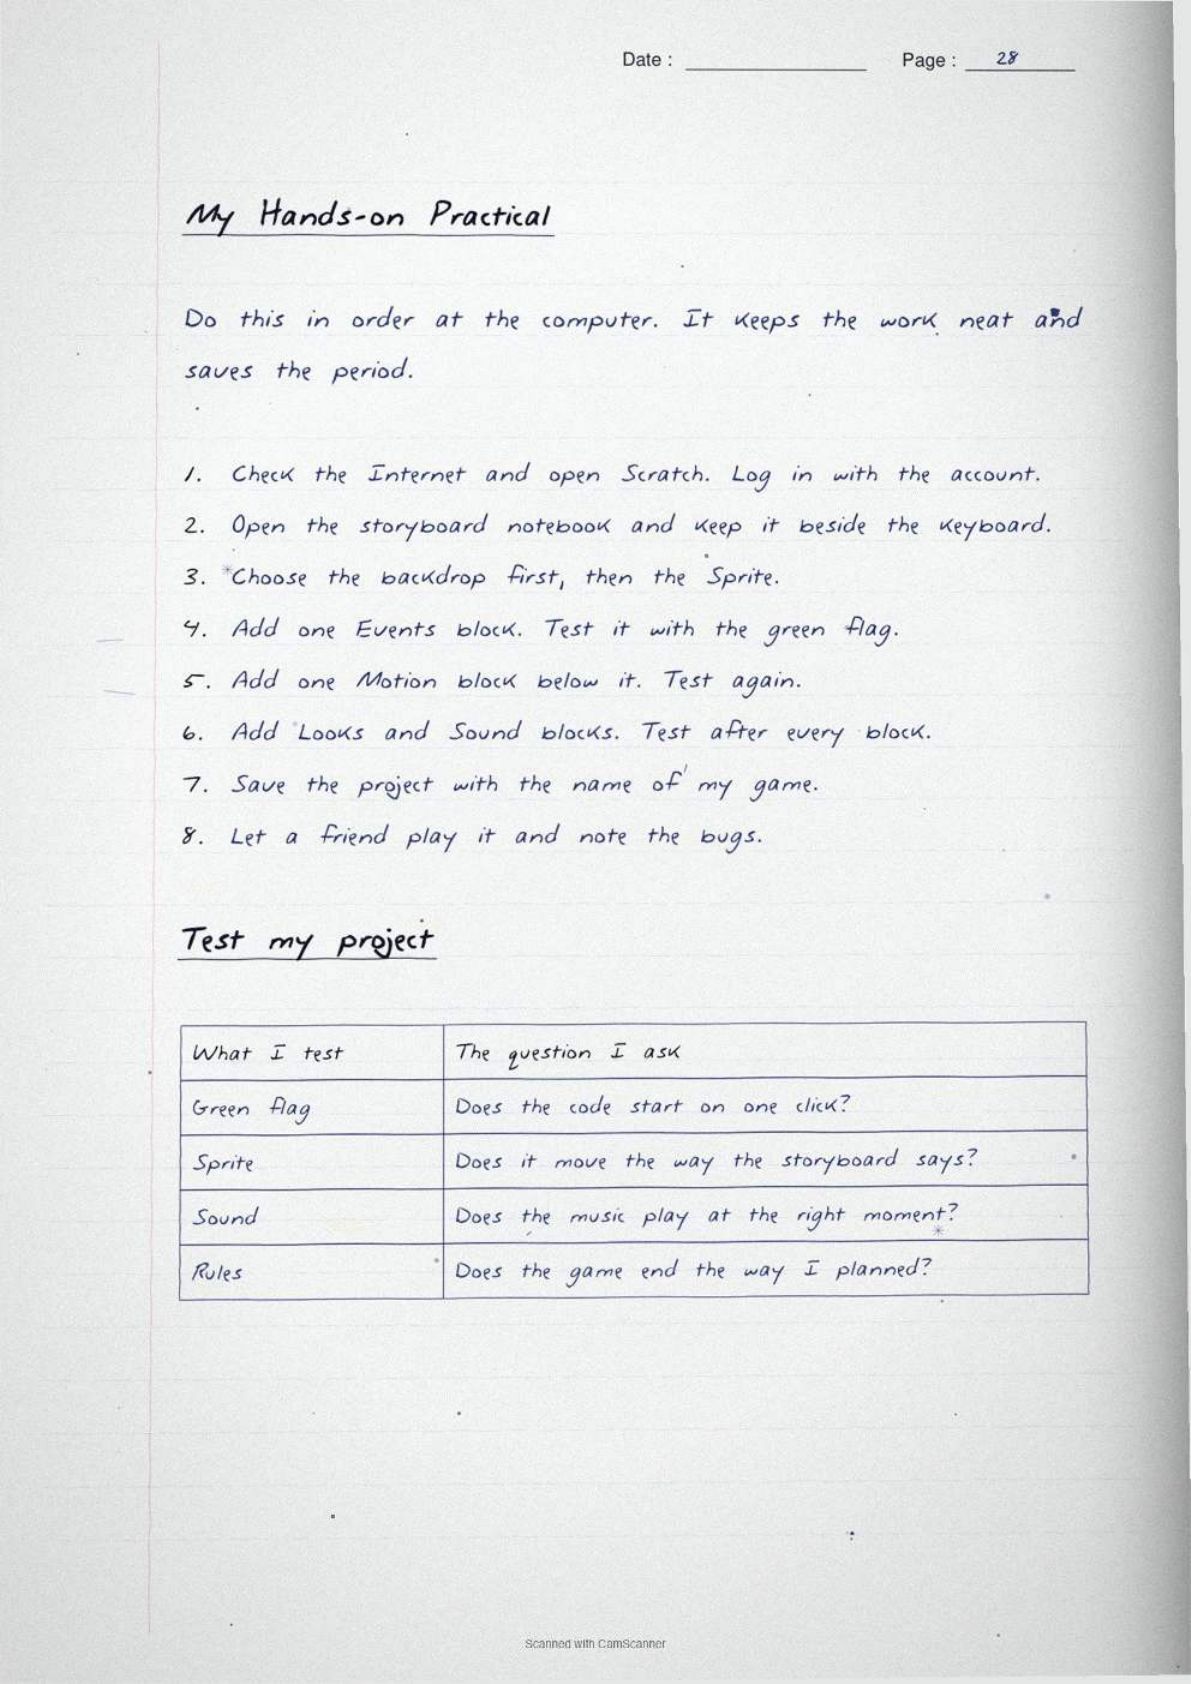
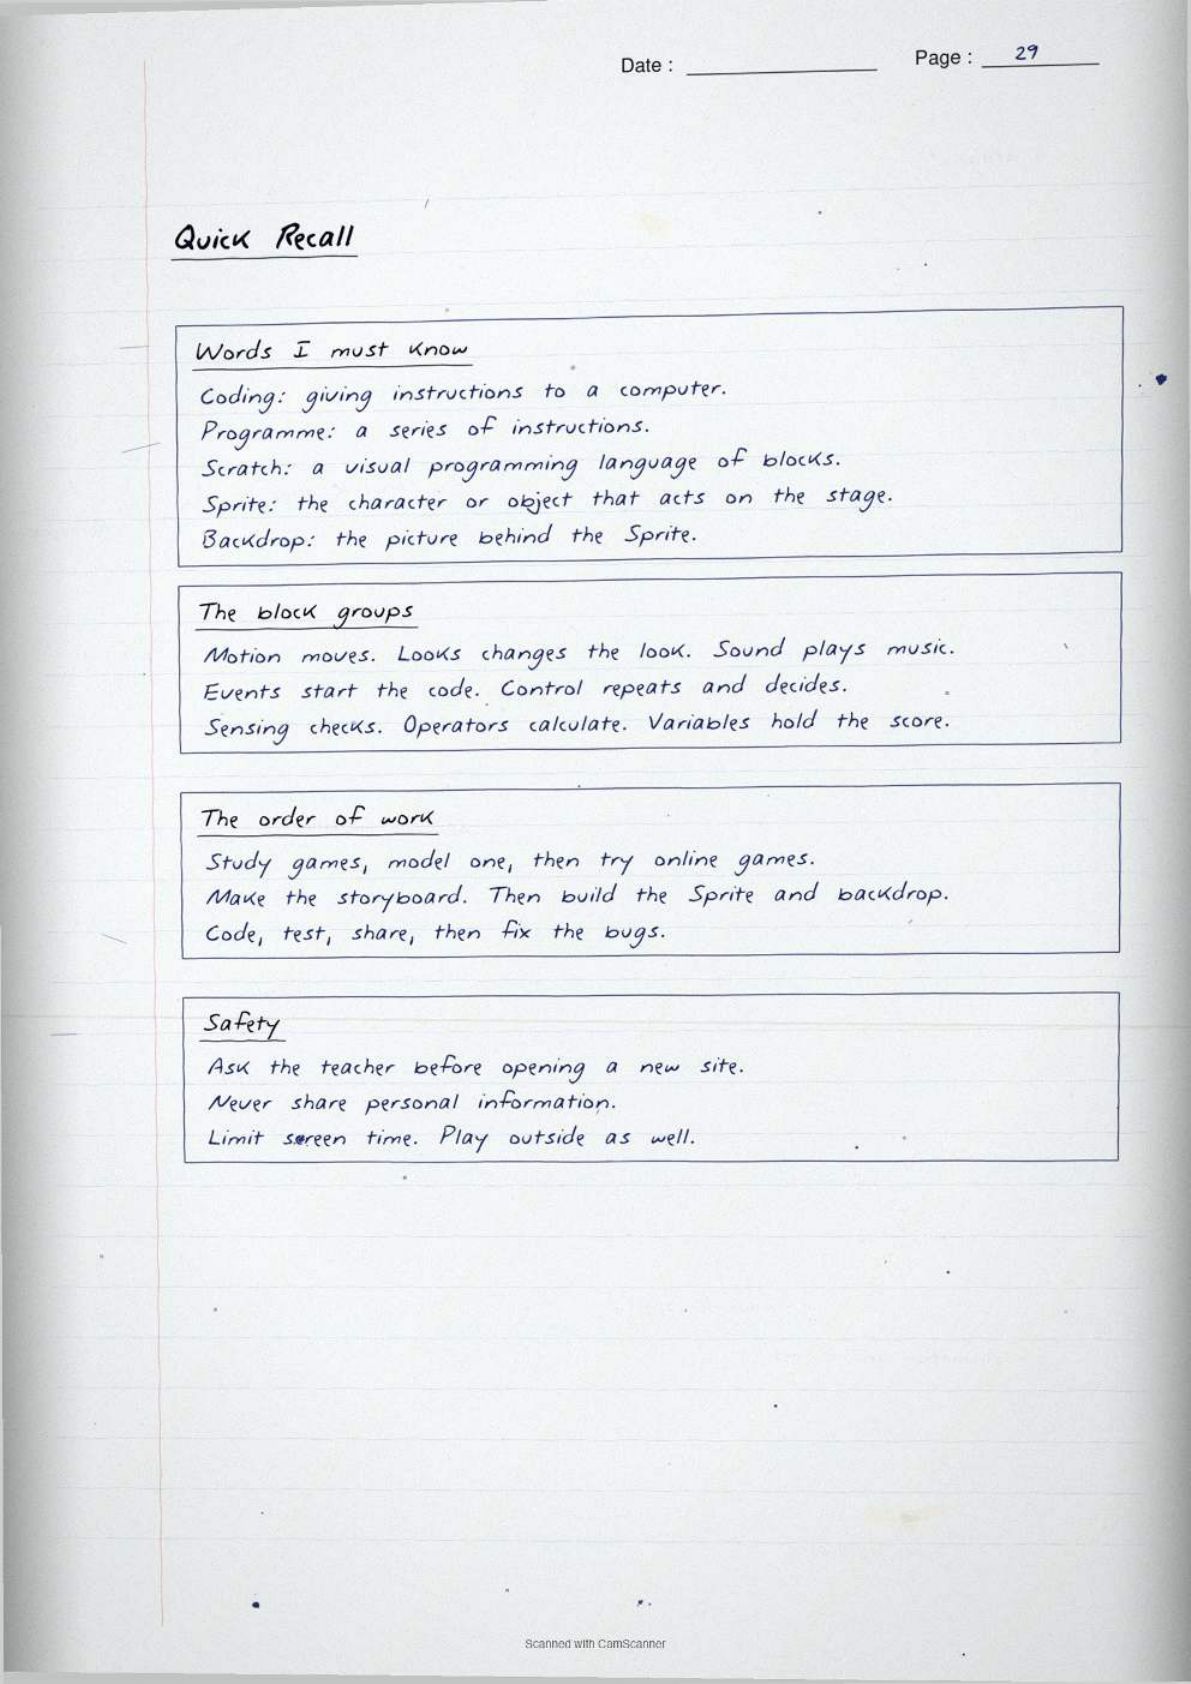
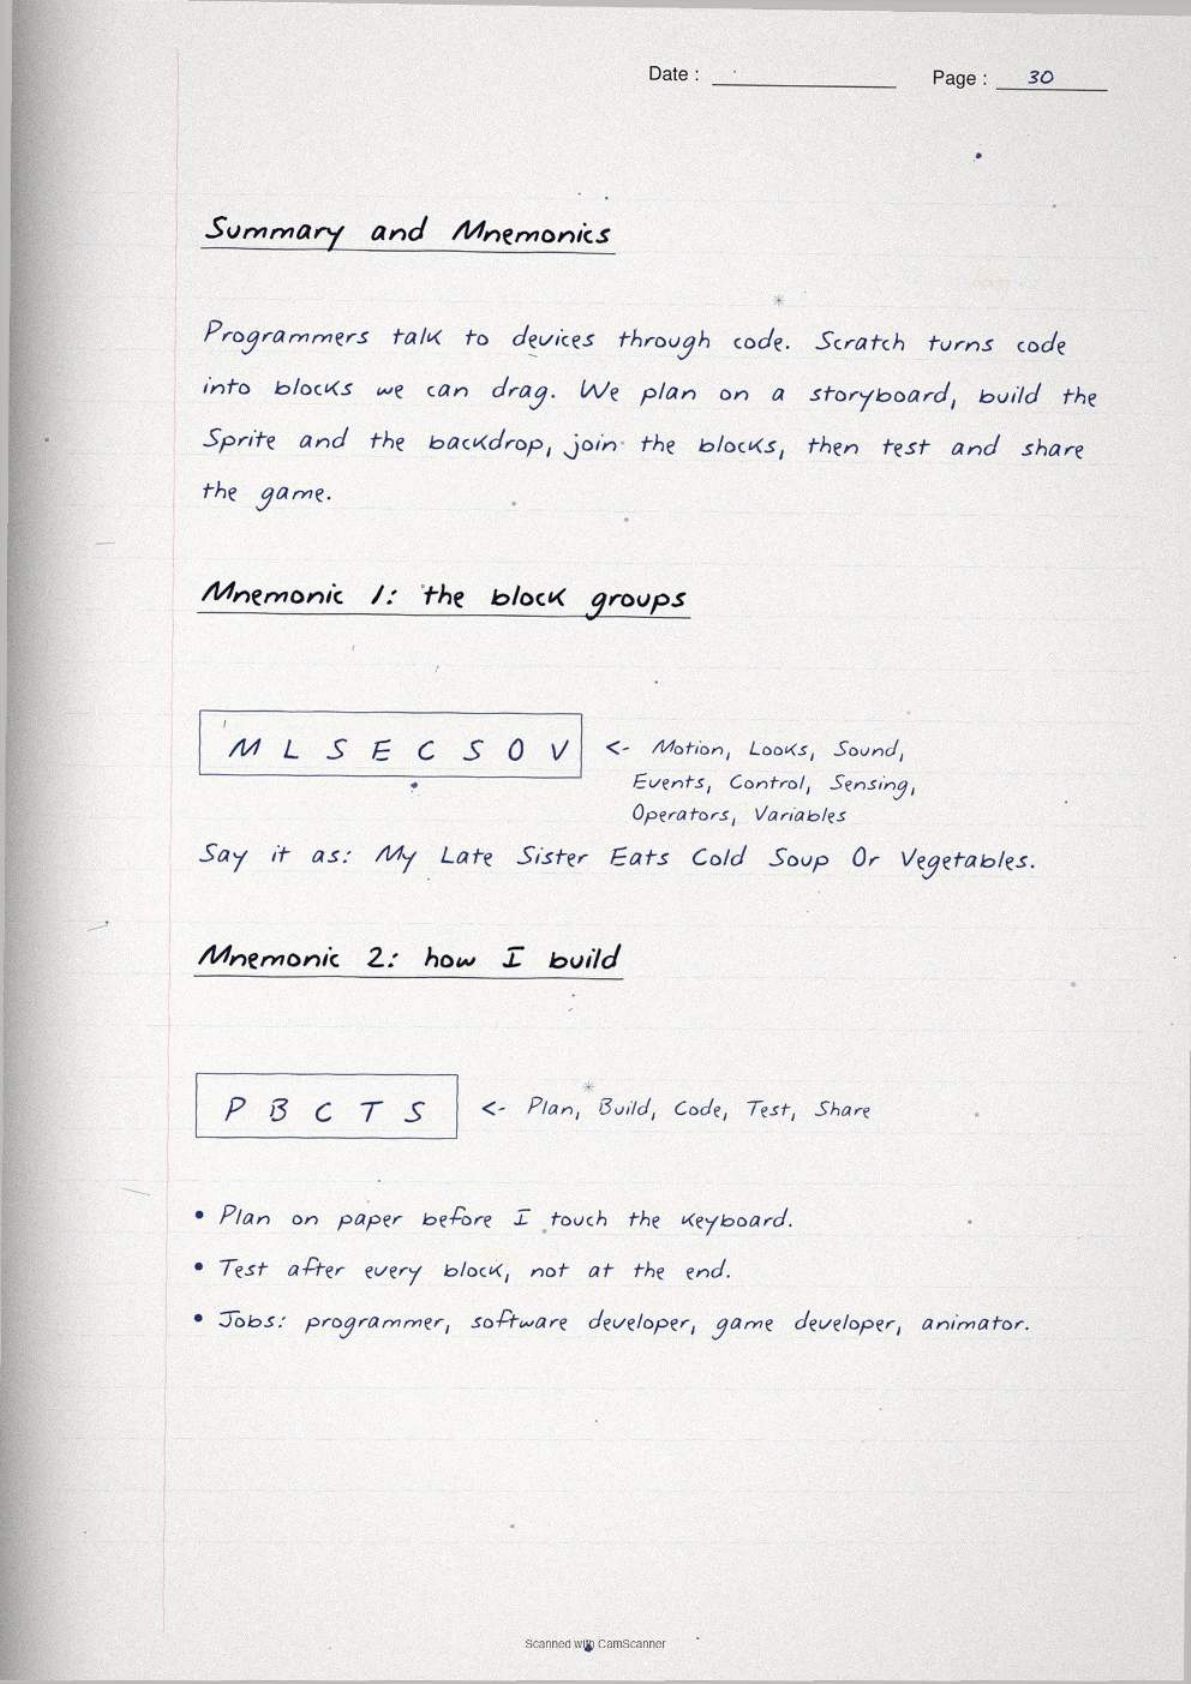
Every page of these Animation and Games notes is written by hand, checked against the 2026-27 Kaushal Bodh print, and matched to the way a Class 6 project file and class test ask about Scratch blocks, Sprites, storyboards and internet safety.
Student Feedback: In a Collegedunia survey of 11,540 Class 6 students who finished this Scratch project, 68% of students said naming the eight block groups was the hardest part of the class test. Toppers reported one fix that worked. Learn the group by the job it does, not by its colour on the screen.
Source: 2026-27 Class 6 Vocational Education student survey. Sample of 11,540 students from schools across 14 states.
What the Animation and Games Project Asks Class 6 Students to Build
Project 4 of Kaushal Bodh is a coding project. You study the games you already play, then build a game and an animation of your own using Scratch. Nothing here is about film animation studios. Everything is done with blocks on a screen.
The book opens by saying that making a game needs two things together, creativity and technology. It all begins with an idea. Designers develop and refine that idea before the work starts. Artists then create the visual parts and programmers do the coding.
Figure 4.1 lists what you will be able to do by the end of the project.
- Learn how we communicate with devices.
- Learn to use Scratch.
- Make a model of an offline game using craft materials.
- Design, try out and improve an online game.
- Make your own animation and game.
The book then states the two learning outcomes in one line each. You should be able to create a simple Scratch project with block programming, and design games and animations using Scratch.
How We Talk to Devices: Coding, Programmes and Programming Languages
This is the theory block of the chapter and it carries the most one-mark questions. Coding is how we give instructions to a computer or a smartphone. When you click a button and the device responds, your click is turned into instructions in a language the machine understands.
A programme is a series of instructions given to a computer or a smartphone. Learn that definition word for word, because it is asked directly.
| Term | What the book says |
|---|---|
| Coding | Giving instructions to a computer so it does what we want |
| Programme | A series of instructions given to computers or smartphones |
| Programmer | The person who writes those instructions |
| Programming language | The language used to communicate with a device, such as Javascript, Python or C++ |
| Visual programming language | A language in which instructions are clubbed into blocks that we move around and join |
The book also lists the devices we can talk to through code: smartphones, computers, tablets, smartwatches, satellites and driverless cars. That list is a common fill in the blanks question, so write all six.
Tip: we use Hindi, English and other languages with people. Programmers use programming languages with devices. That one sentence pair answers the "why do we need programming languages" question.
What Scratch Is and Why It Is Called a Visual Programming Language
Scratch is the tool used throughout this project. The book says Scratch is easy to use and calls it a visual programming language, because you move blocks around instead of writing long programmes in languages that take time to learn.
With those blocks you can do three things named in the chapter.
- Create animated figures.
- Design games.
- Create your own wallpaper.
Blocks snap together like the pieces of a jigsaw. You drag one block under another and they join, and the joined stack becomes a set of instructions the Sprite follows. This is the whole idea behind block programming, and it is worth writing in your own words in the project file.
Scratch Basics for the Animation and Games Project
Source: NCERT OFFICIAL on YouTube
The Default Scratch Window and Its Four Working Areas
Figure 4.3 in the book shows the default Scratch window. Students lose marks here by naming the parts wrongly, so learn the layout as four areas.
| Area of the screen | What it is for |
|---|---|
| Block palette | Sits on the left. Holds the block groups: Motion, Looks, Sound, Events, Control, Sensing, Operators and Variables |
| Code area | The middle space where you drag blocks and join them into a script |
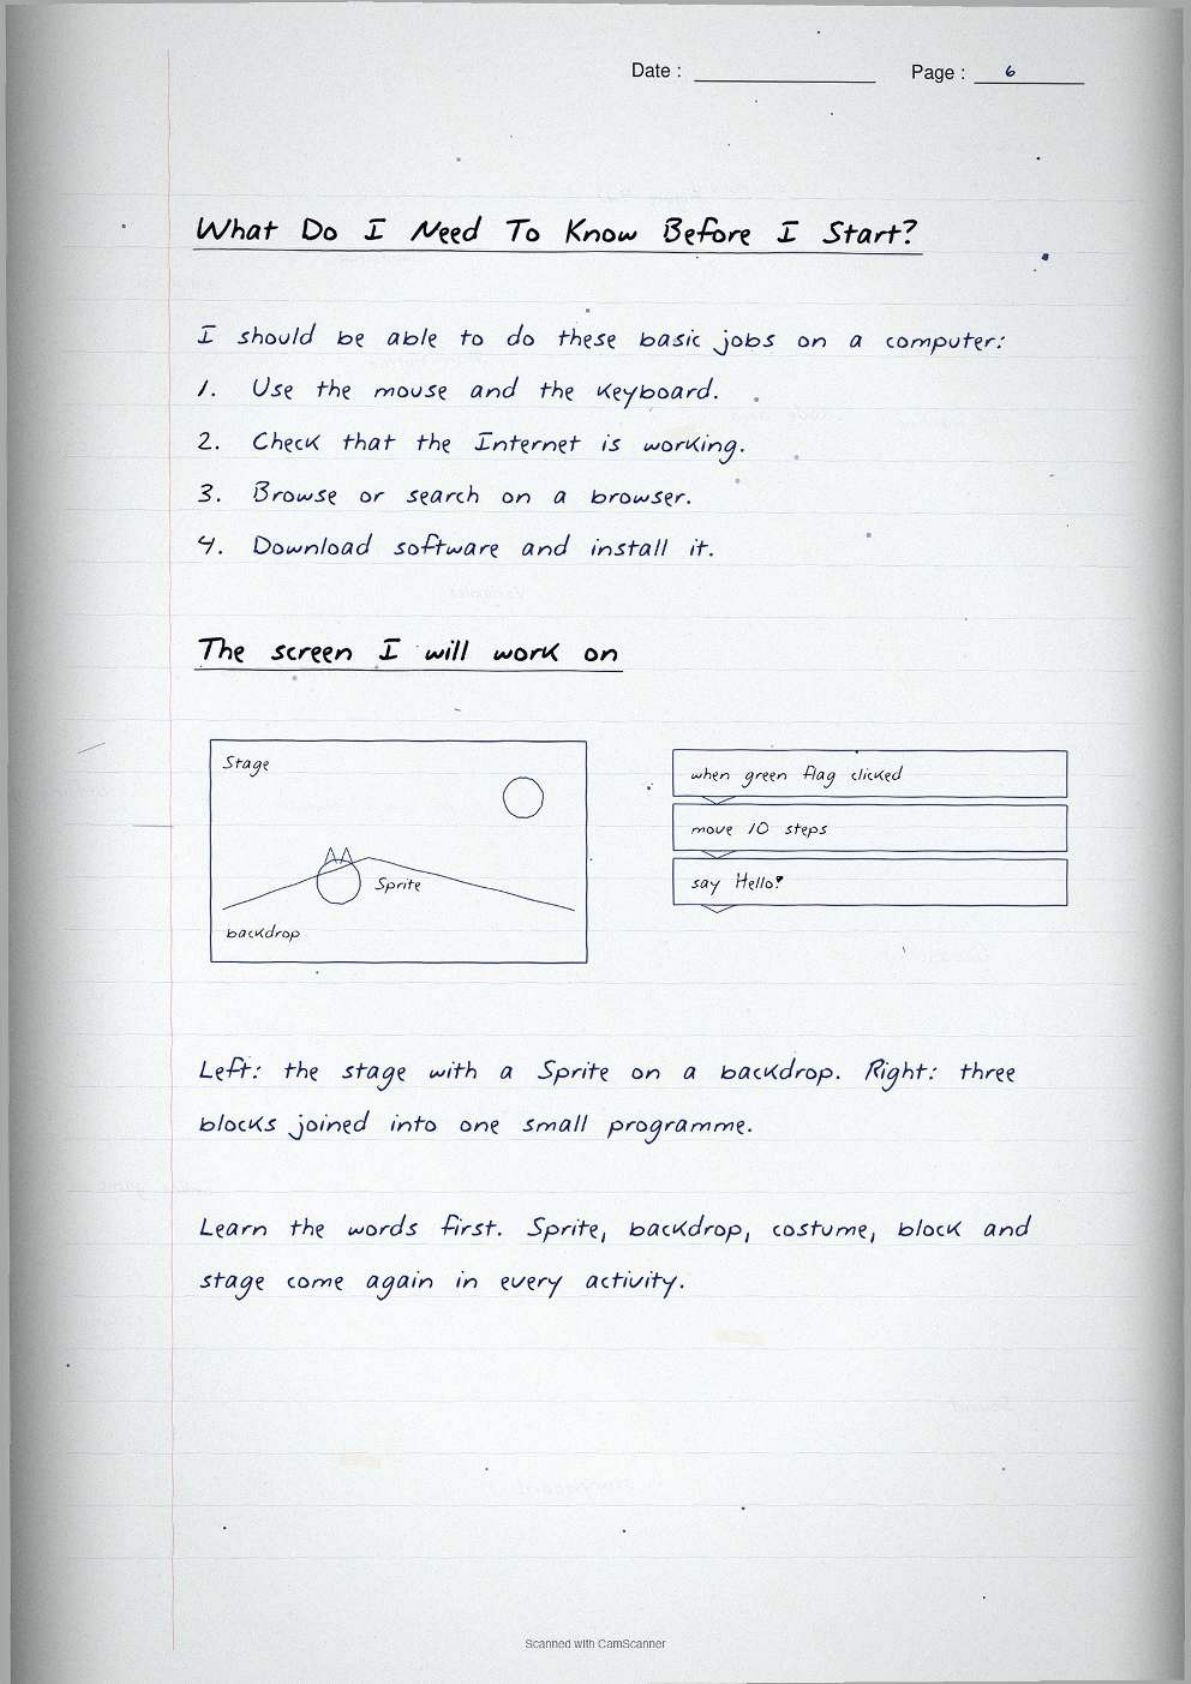
| Stage | The window on the right where the game is played and the Sprite runs |
| Sprite list | Below the stage. Shows every Sprite in the project, and the backdrop button |
Drag a block from the palette into the code area, then press the green flag to watch it run on the stage. That is the working loop you repeat for the rest of the project.
What You Need and How to Stay Safe Online During the Animation and Games Project
The materials list is short and gives easy marks. The book asks for seven things.
- A computer or laptop with an internet connection.
- Scratch downloaded on that computer or laptop.
- A notebook, and a pen or pencil.
- Loose papers for rough work and the storyboard.
- Markers to colour the storyboard cards, and cardboards for the game model.
Before you start, you should already be able to use the mouse and keyboard, check that the internet is working, browse or search on a browser, and download and install software.
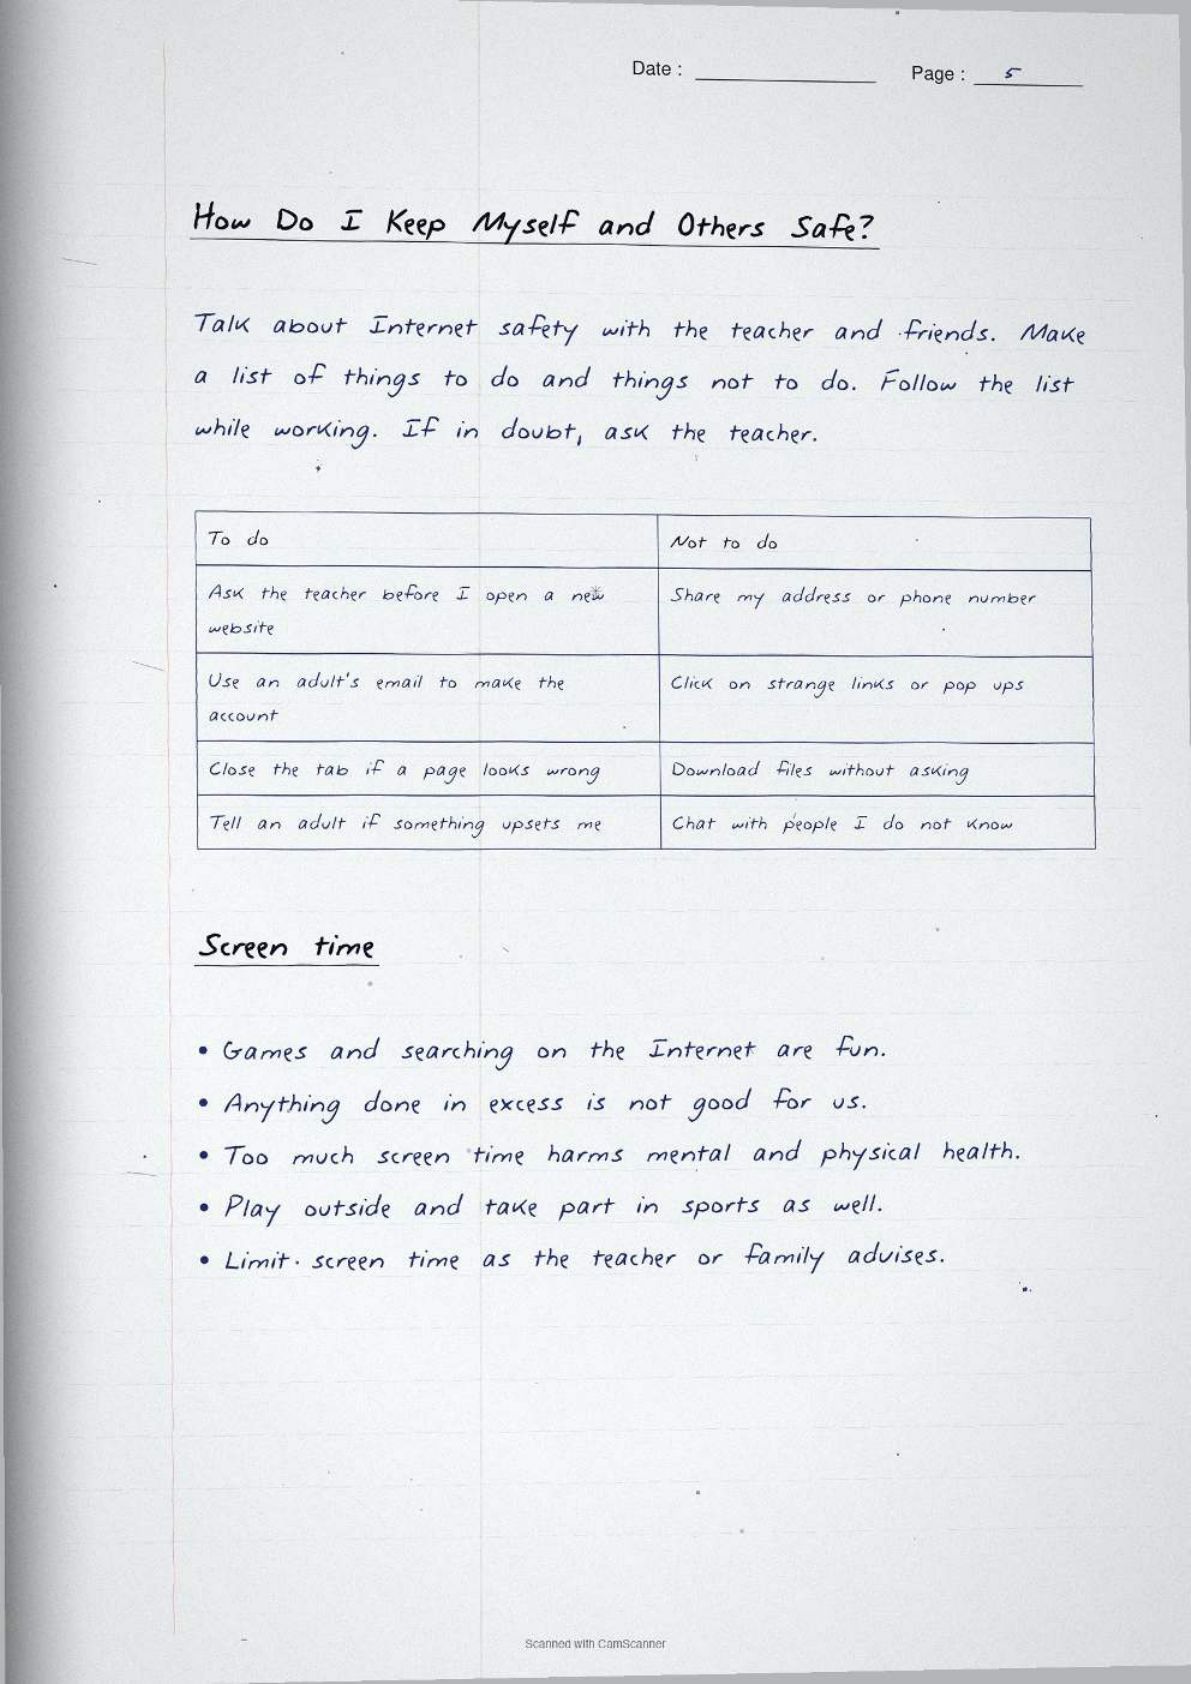
The safety section has two halves. The first is about the internet. Discuss the precautions with your teacher and your friends, then make a list of things to do and things not to do, and follow it while you work.
| Do this | Do not do this |
|---|---|
| Ask the teacher before opening a new website | Share your address or phone number |
| Use an adult's email address to make the account | Click on strange links or pop ups |
| Close the tab if a page looks wrong | Download files without asking |
| Tell an adult if something upsets you | Chat with people you do not know |
The second half is about screen time. Anything done in excess is not good, and too much screen time harms mental and physical health. The book asks you to play outside and take part in physical sports as well, and to limit screen time as your teacher or family advises.
Activity 1 and Activity 2: Studying Your Favourite Game and Making a Model of It
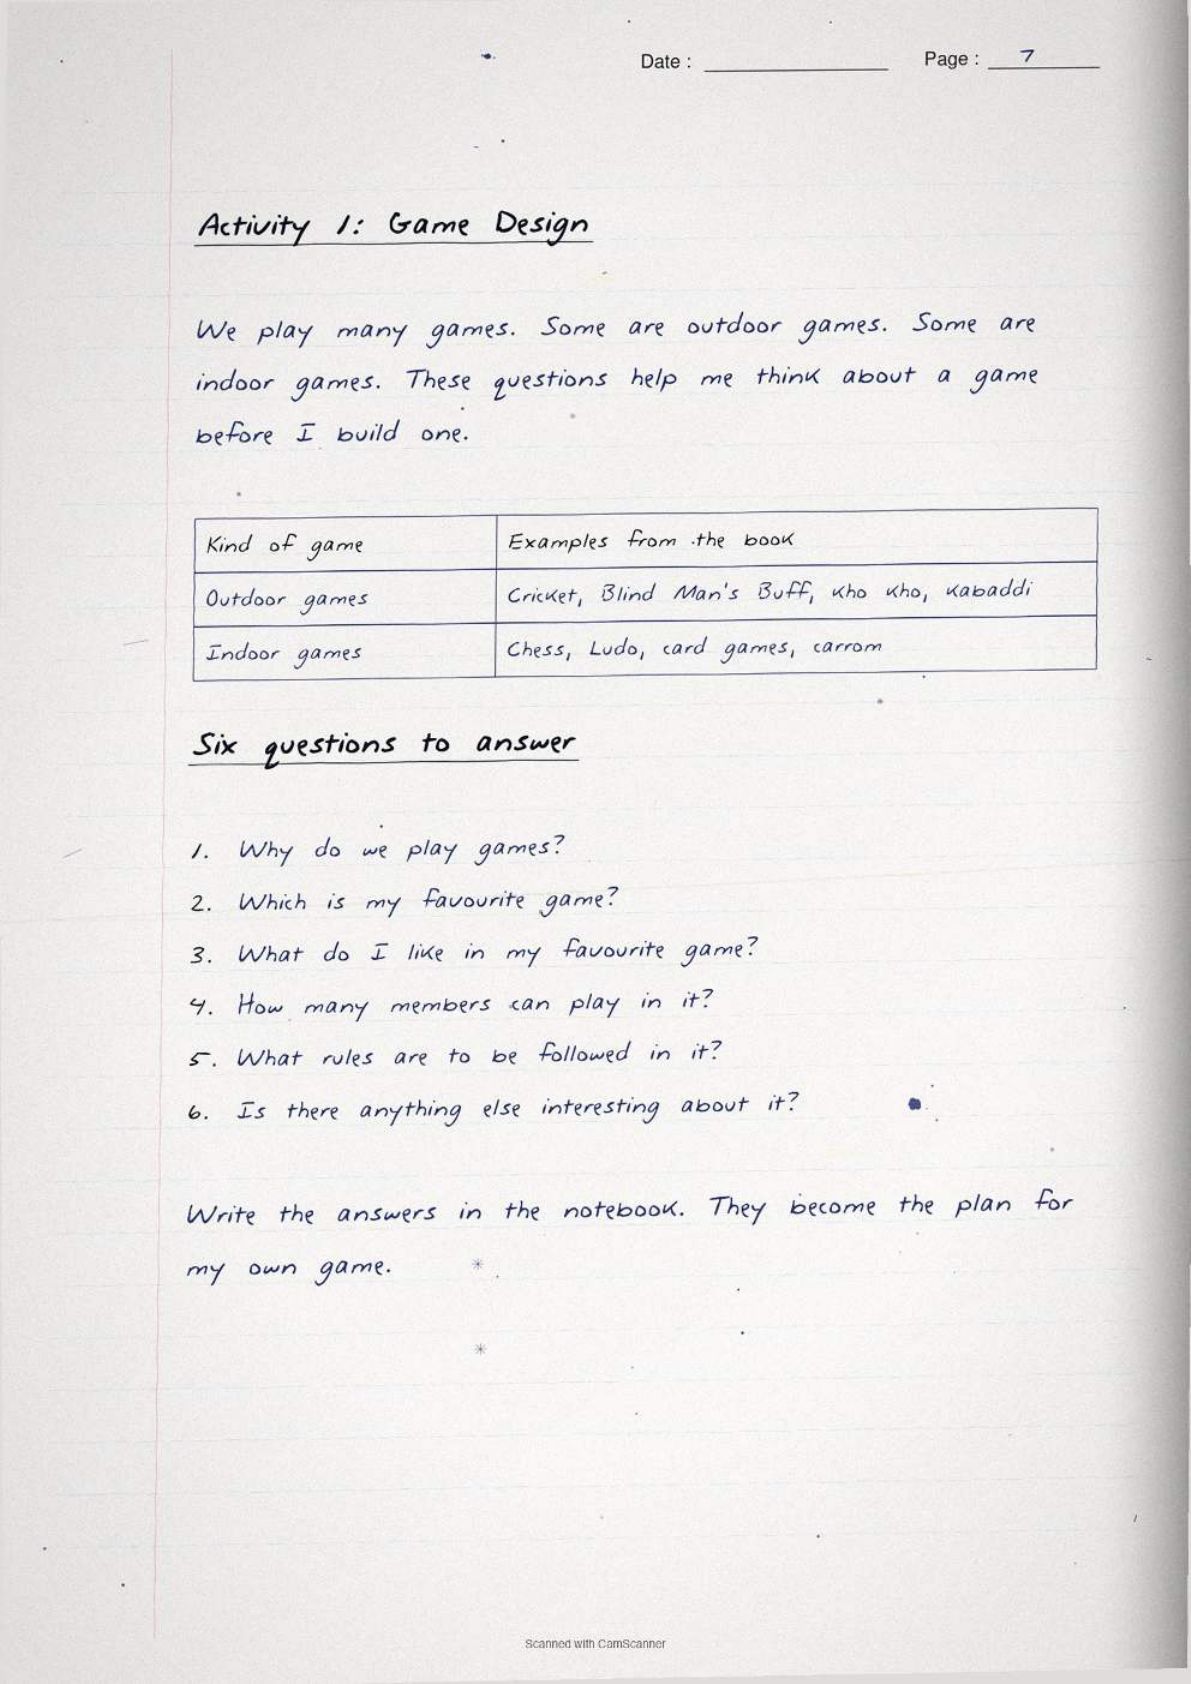
The project starts away from the computer. Activity 1 asks you to think about the games you play. The book splits them into outdoor games such as Cricket and Blind Man's Buff, and indoor games such as Chess, Ludo and card games.
Six questions are given, and your answers become the plan for your own game.
- Why do we play games?
- Which is your favourite game?
- What do you like in your favourite game?
- How many members can play in it?
- What rules are to be followed in it?
- Is there anything else interesting about it?
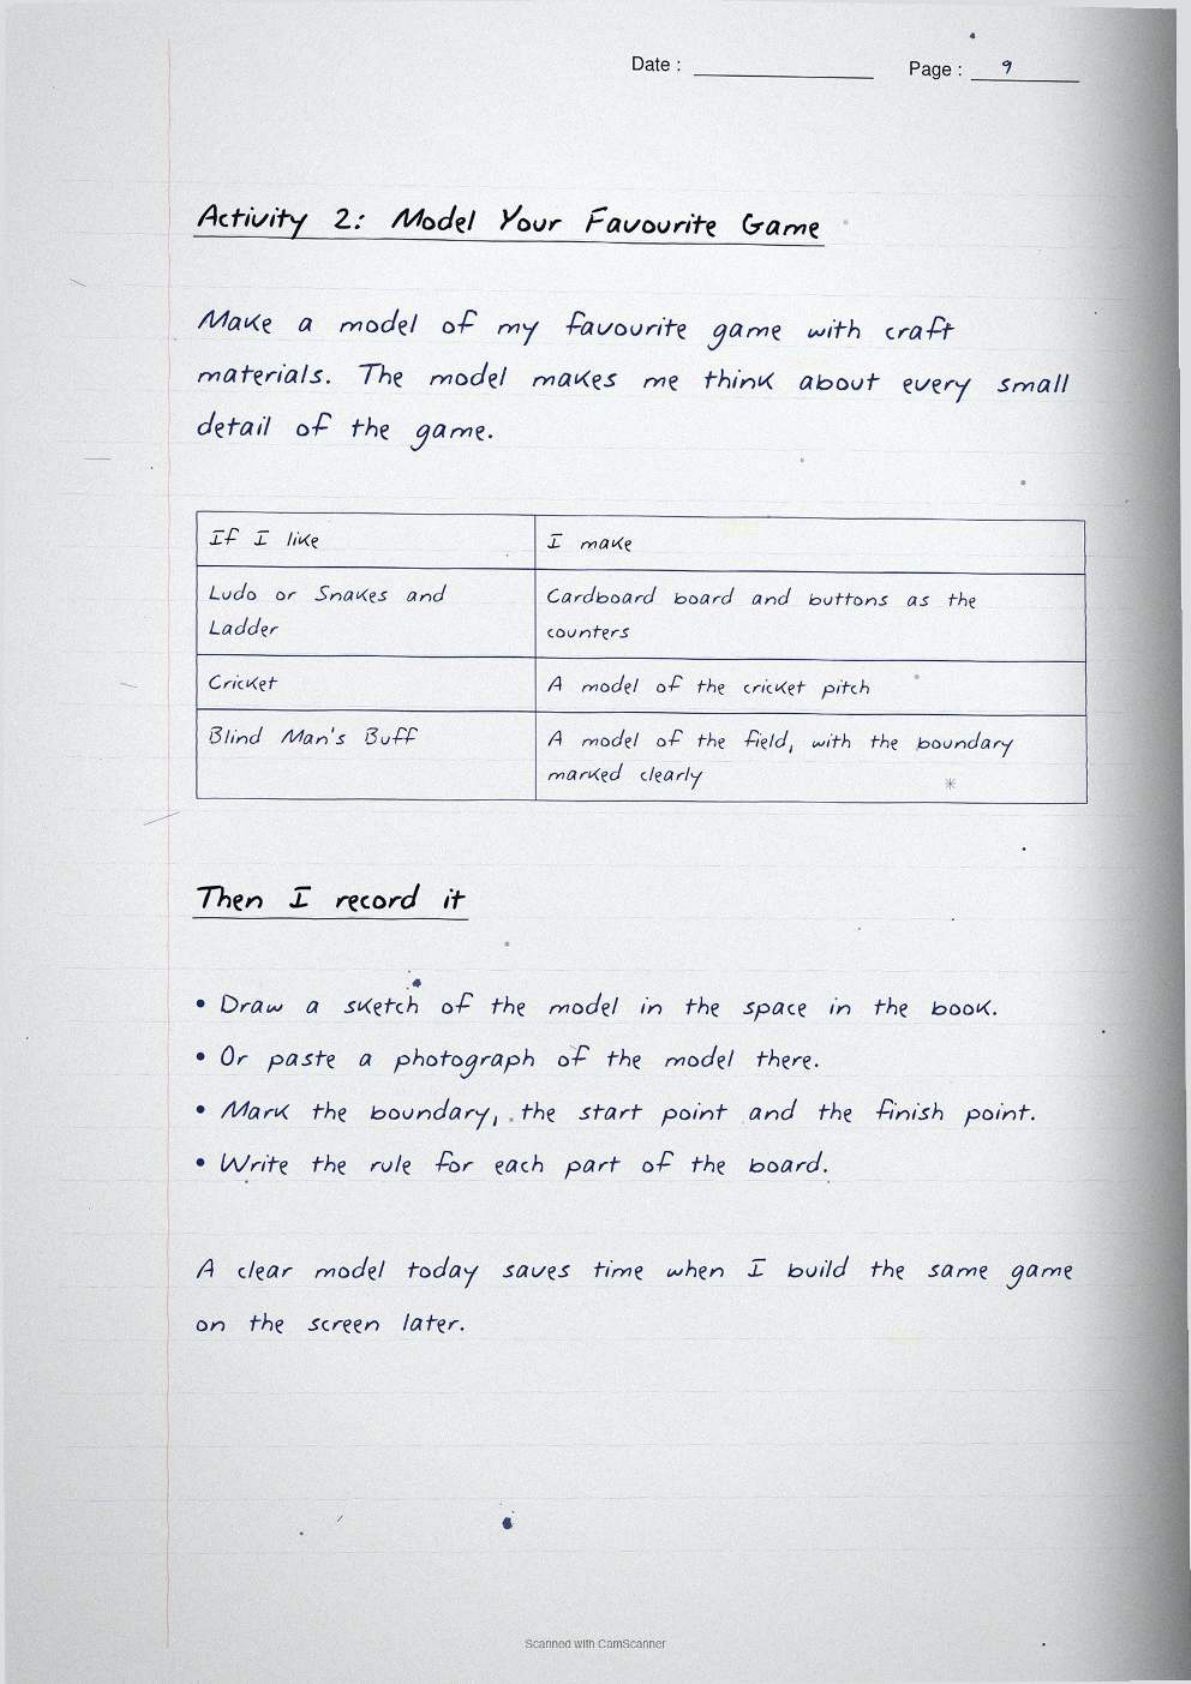
Activity 2 asks you to make a model of your favourite game using craft materials. For Ludo or Snakes and Ladders use cardboard and buttons for the board. For cricket make a model of the pitch. For Blind Man's Buff make a model of the field with the boundary marked clearly. Then draw a sketch of the model in the book, or paste a photograph of it.
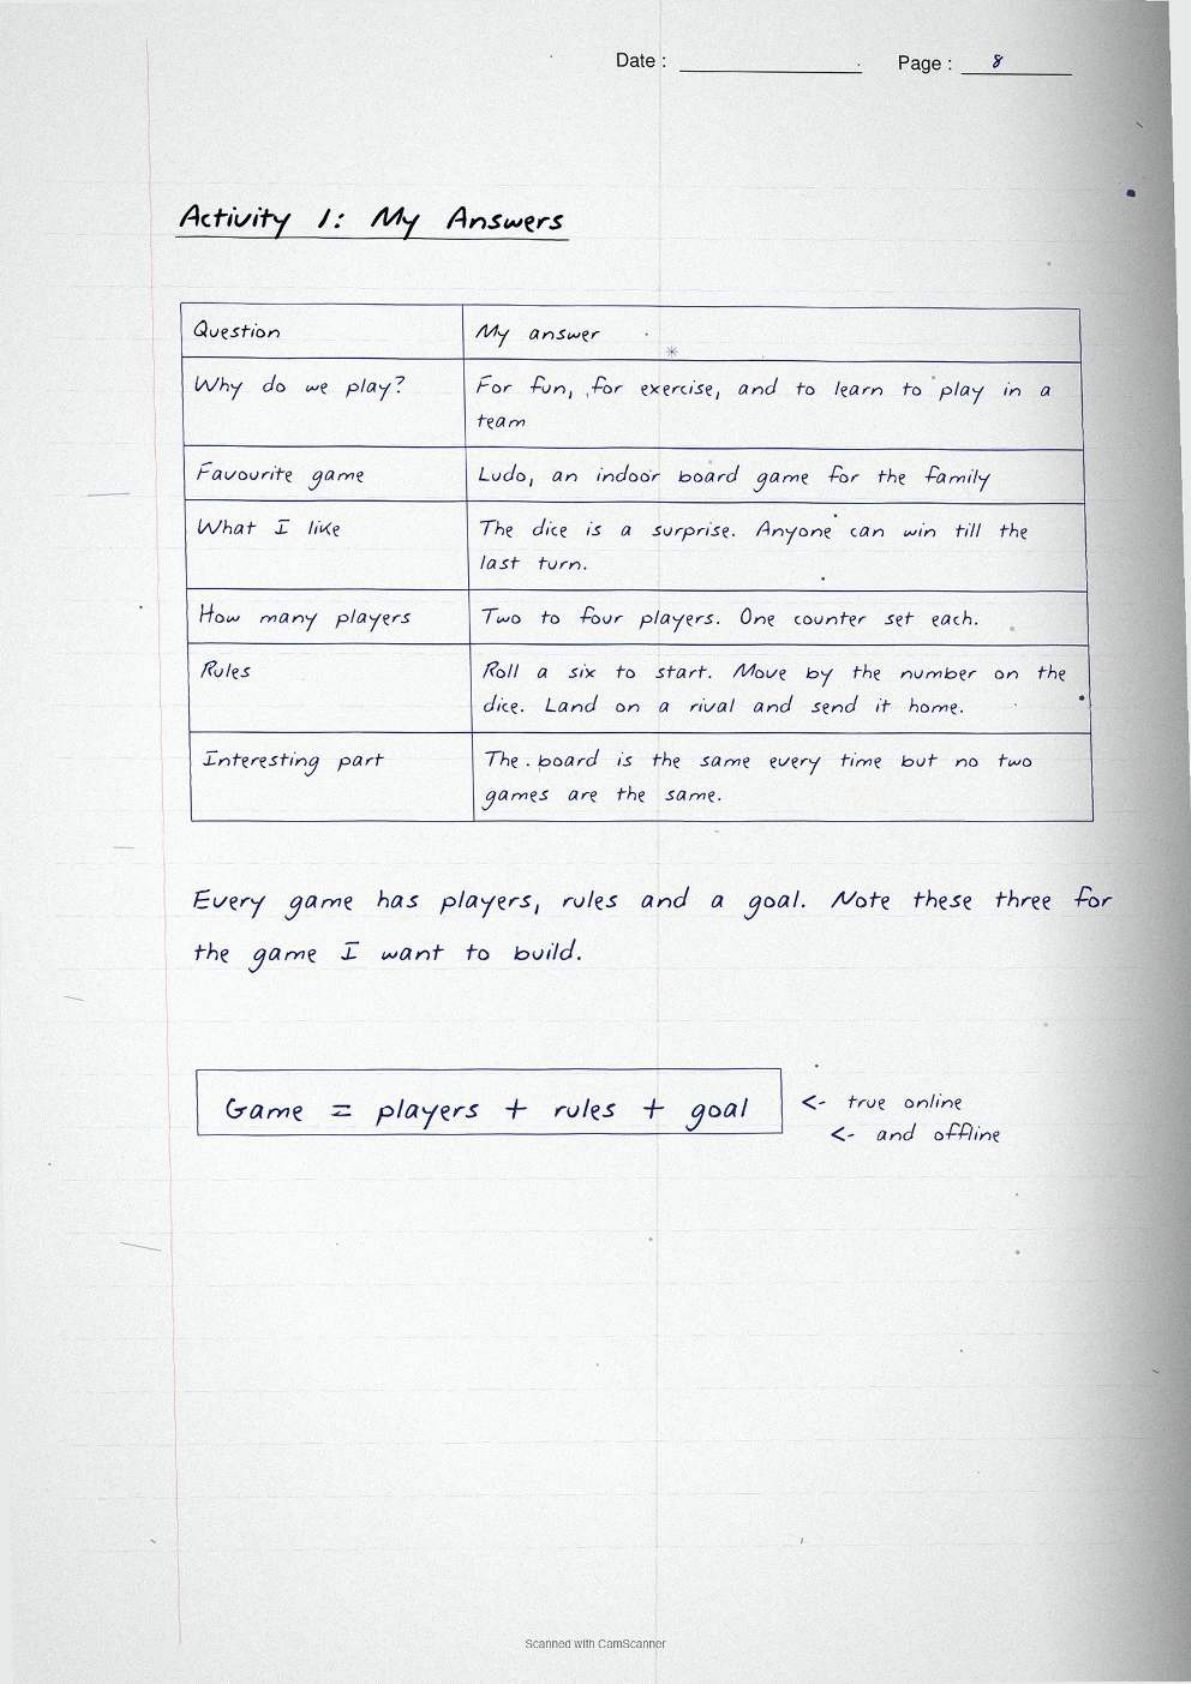
Tip: the single line worth memorising from these two activities is every game has players, rules and a goal. Note those three parts for any game you describe.
Activity 3 and Activity 4: Trying Online Games and Getting Ready to Build
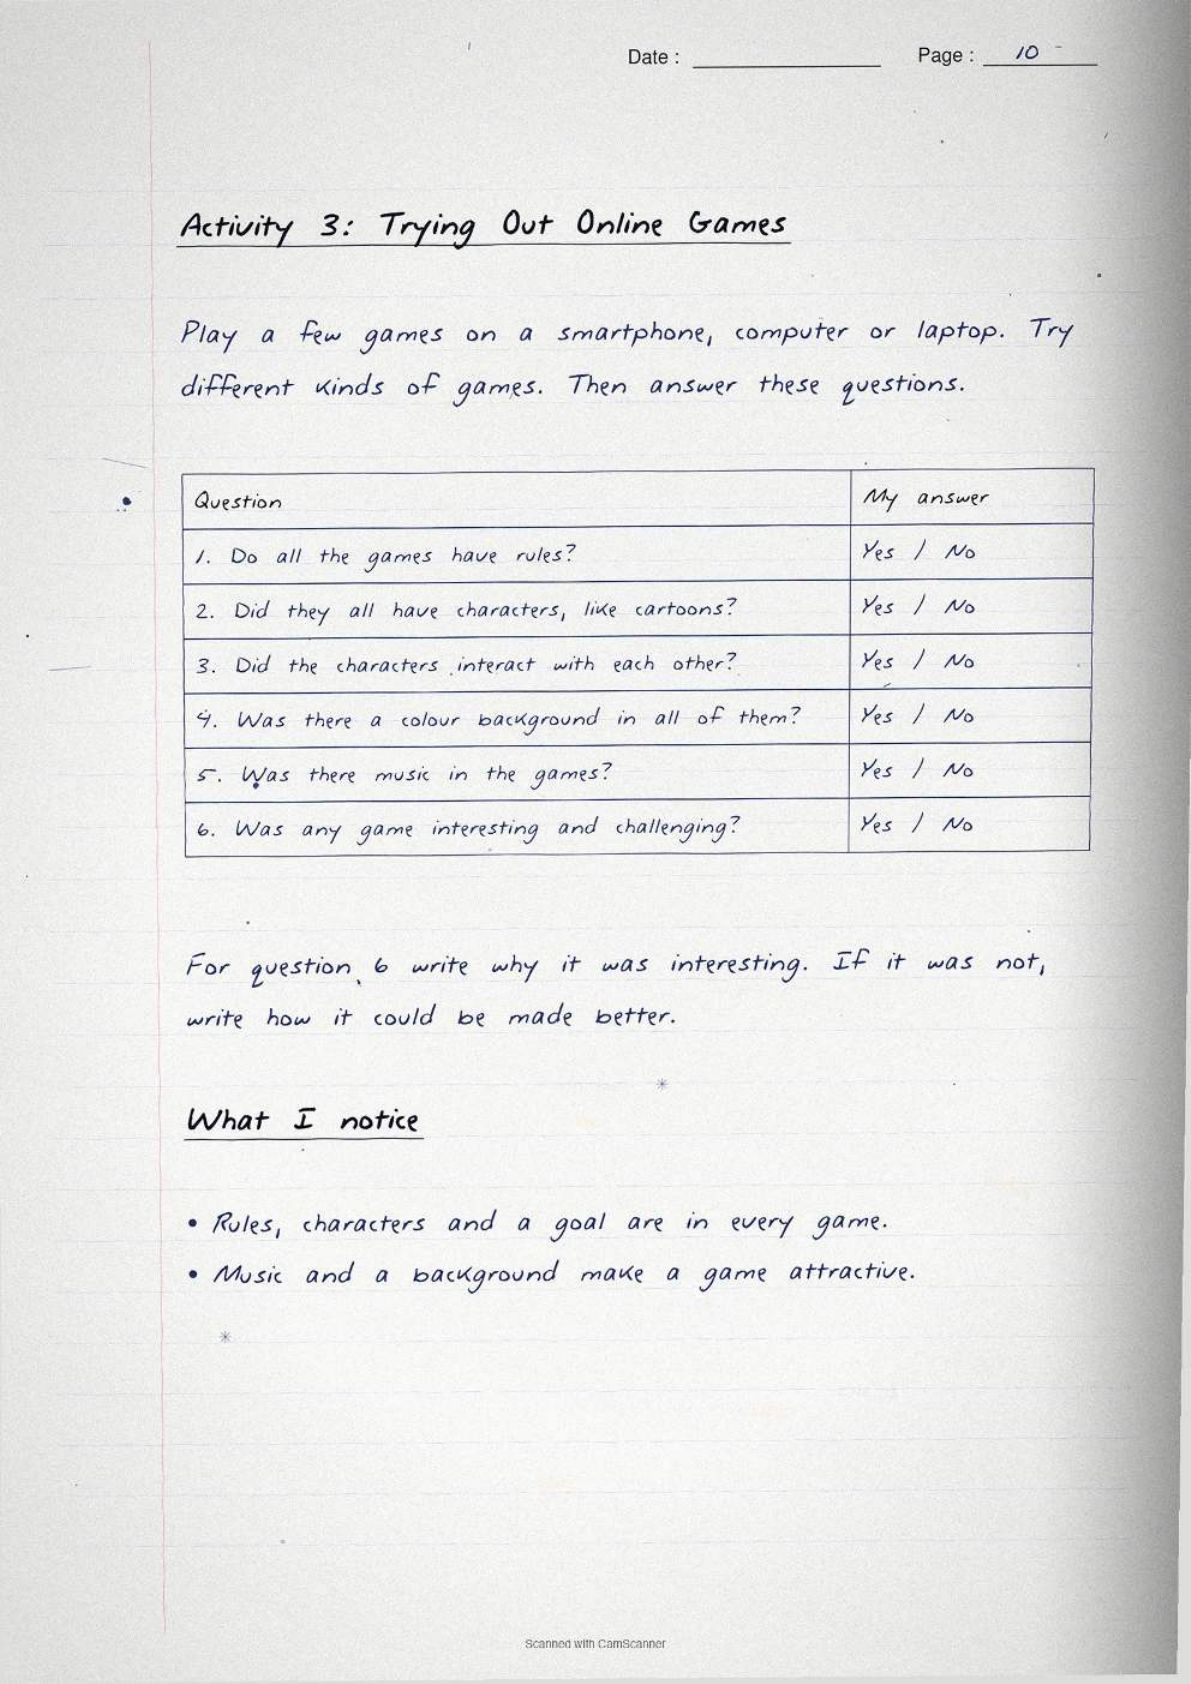
Activity 3 moves you online. Play a few games on a smartphone, computer or laptop, try different kinds, then answer six yes or no questions about what you saw.
- Do all the games have rules?
- Did they all have characters, such as cartoons?
- Did the characters interact with each other?
- Was there a colour background in all the games?
- Was there music in the games?
- Did you find any game interesting and challenging, and why?
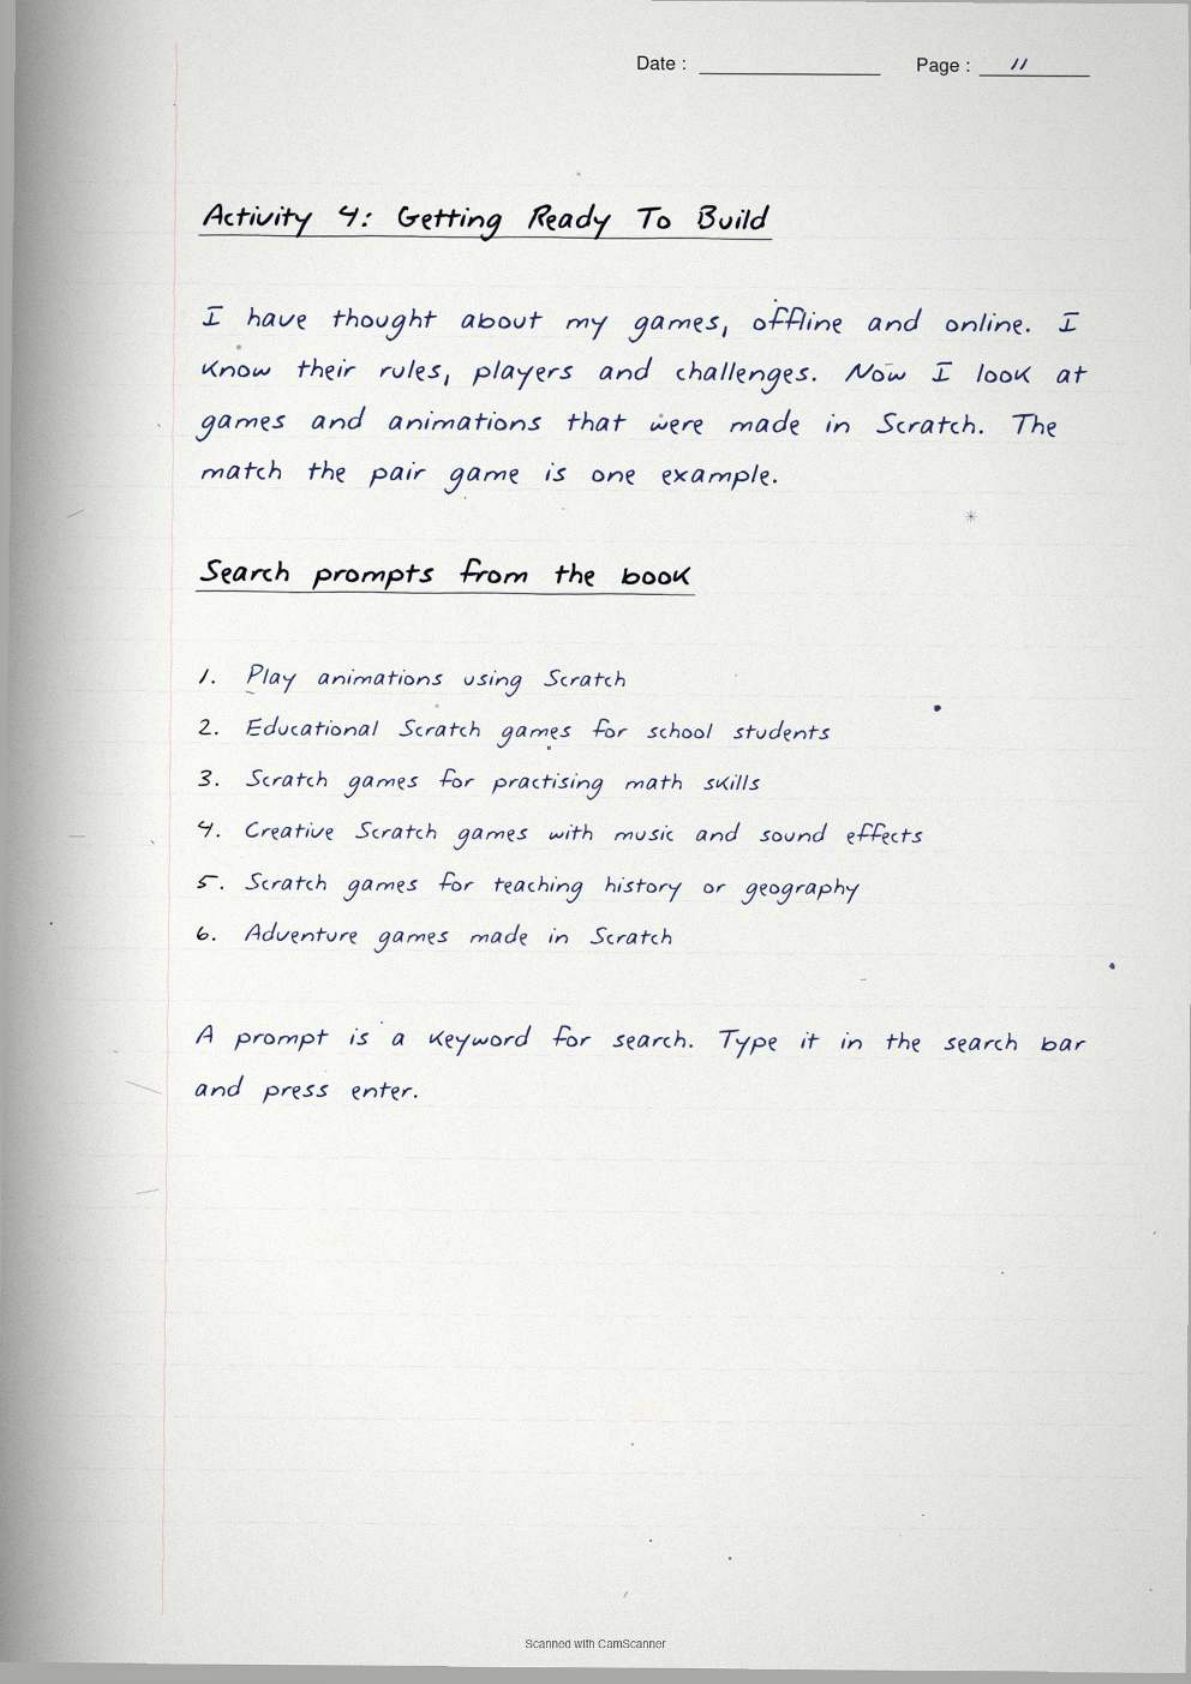
Activity 4 gets you ready to build. You now look for interesting online games and animations already made in Scratch, such as the match the pair game in Figure 4.5 that asks you to match the layers of soil correctly.
The book gives six search prompts. A prompt is simply a keyword you type into the search bar.
- Play animations using Scratch
- Educational Scratch games for school students
- Scratch games for practising math skills
- Creative Scratch games with music and sound effects
- Scratch games for teaching history or geography
- Adventure games made in Scratch
Creating a Scratch Account and the Search Prompts for Scratch Tutorials
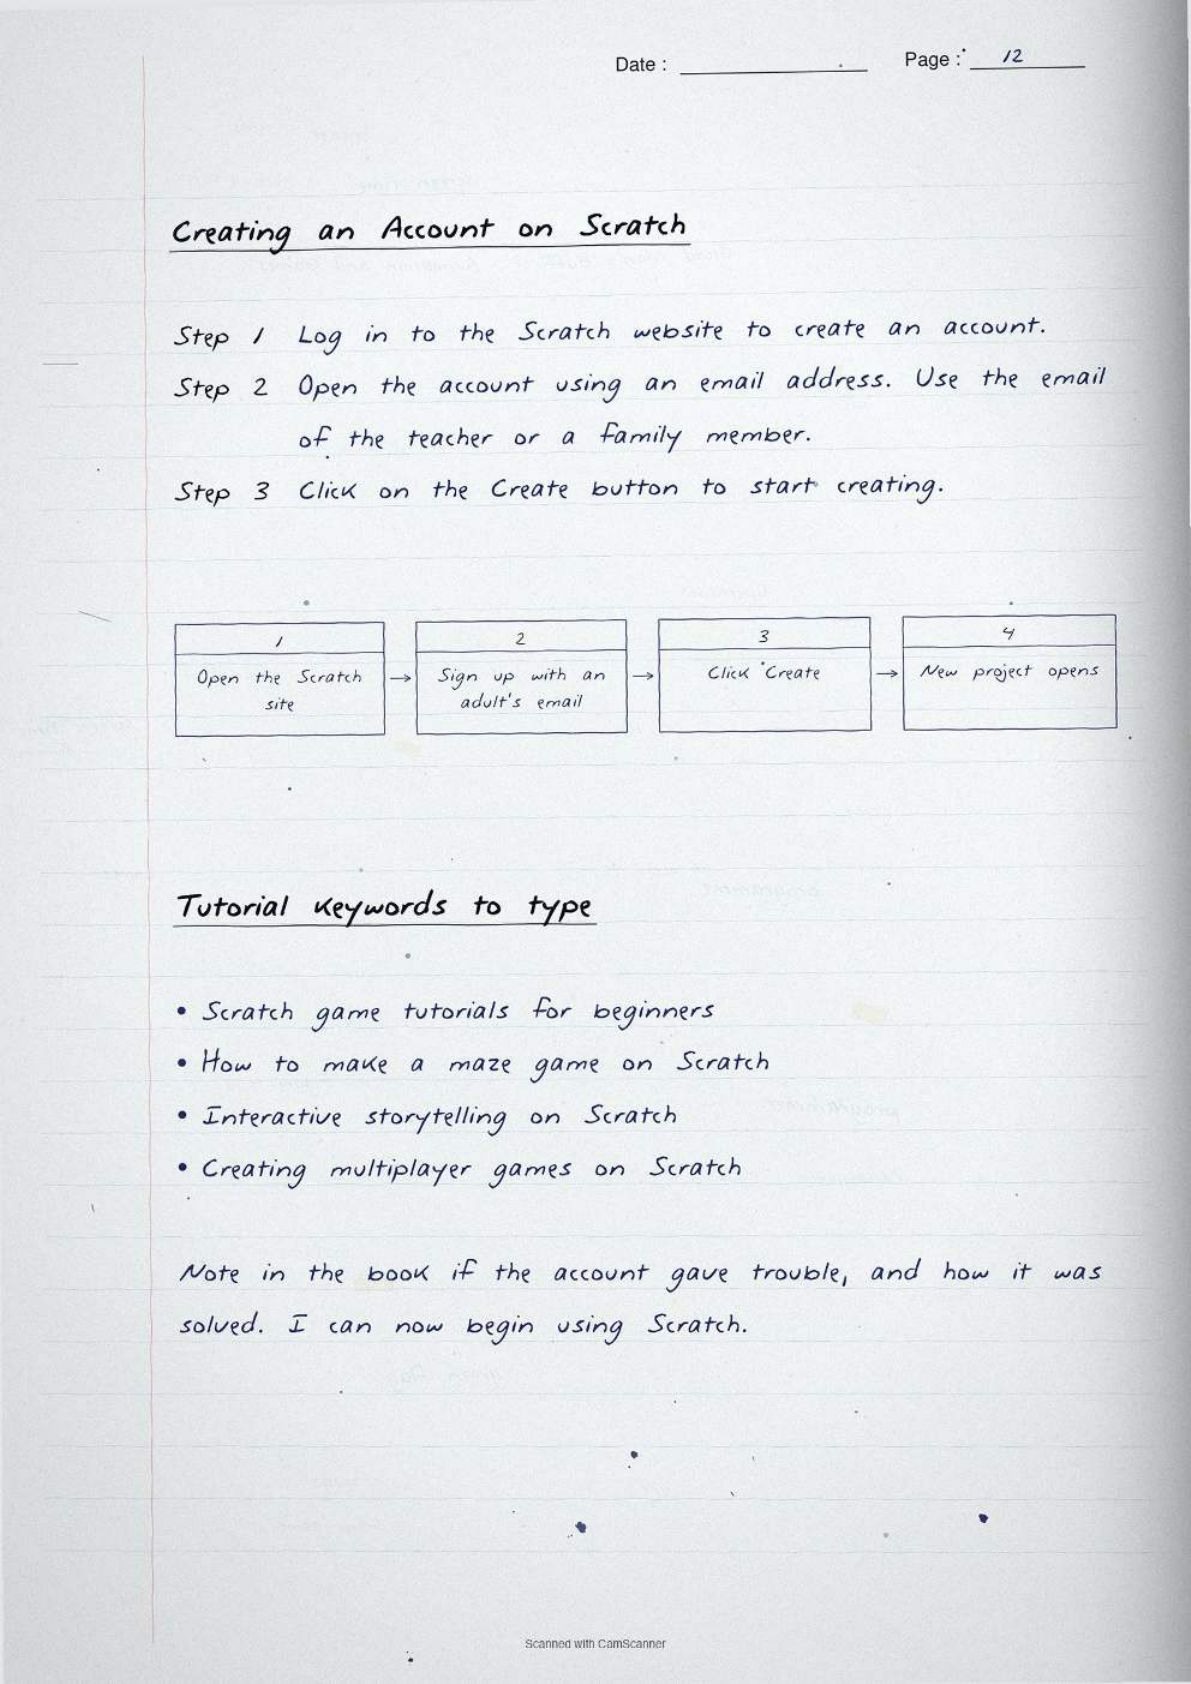
The chapter gives account creation as a three step box, and it is a ready three-mark question in the class test.
- Log in to the Scratch website to create an account.
- Open the account using an email address. Use the email of your teacher or a family member.
- Click the Create button to start creating.
Four more keywords are listed for finding tutorials once your account is ready: Scratch game tutorials for beginners, how to make a maze game on Scratch, interactive storytelling on Scratch, and creating multiplayer games on Scratch.
The book then asks you to note whether the account gave you any trouble and how it was solved. Write a real answer here, because the project file is checked for it.
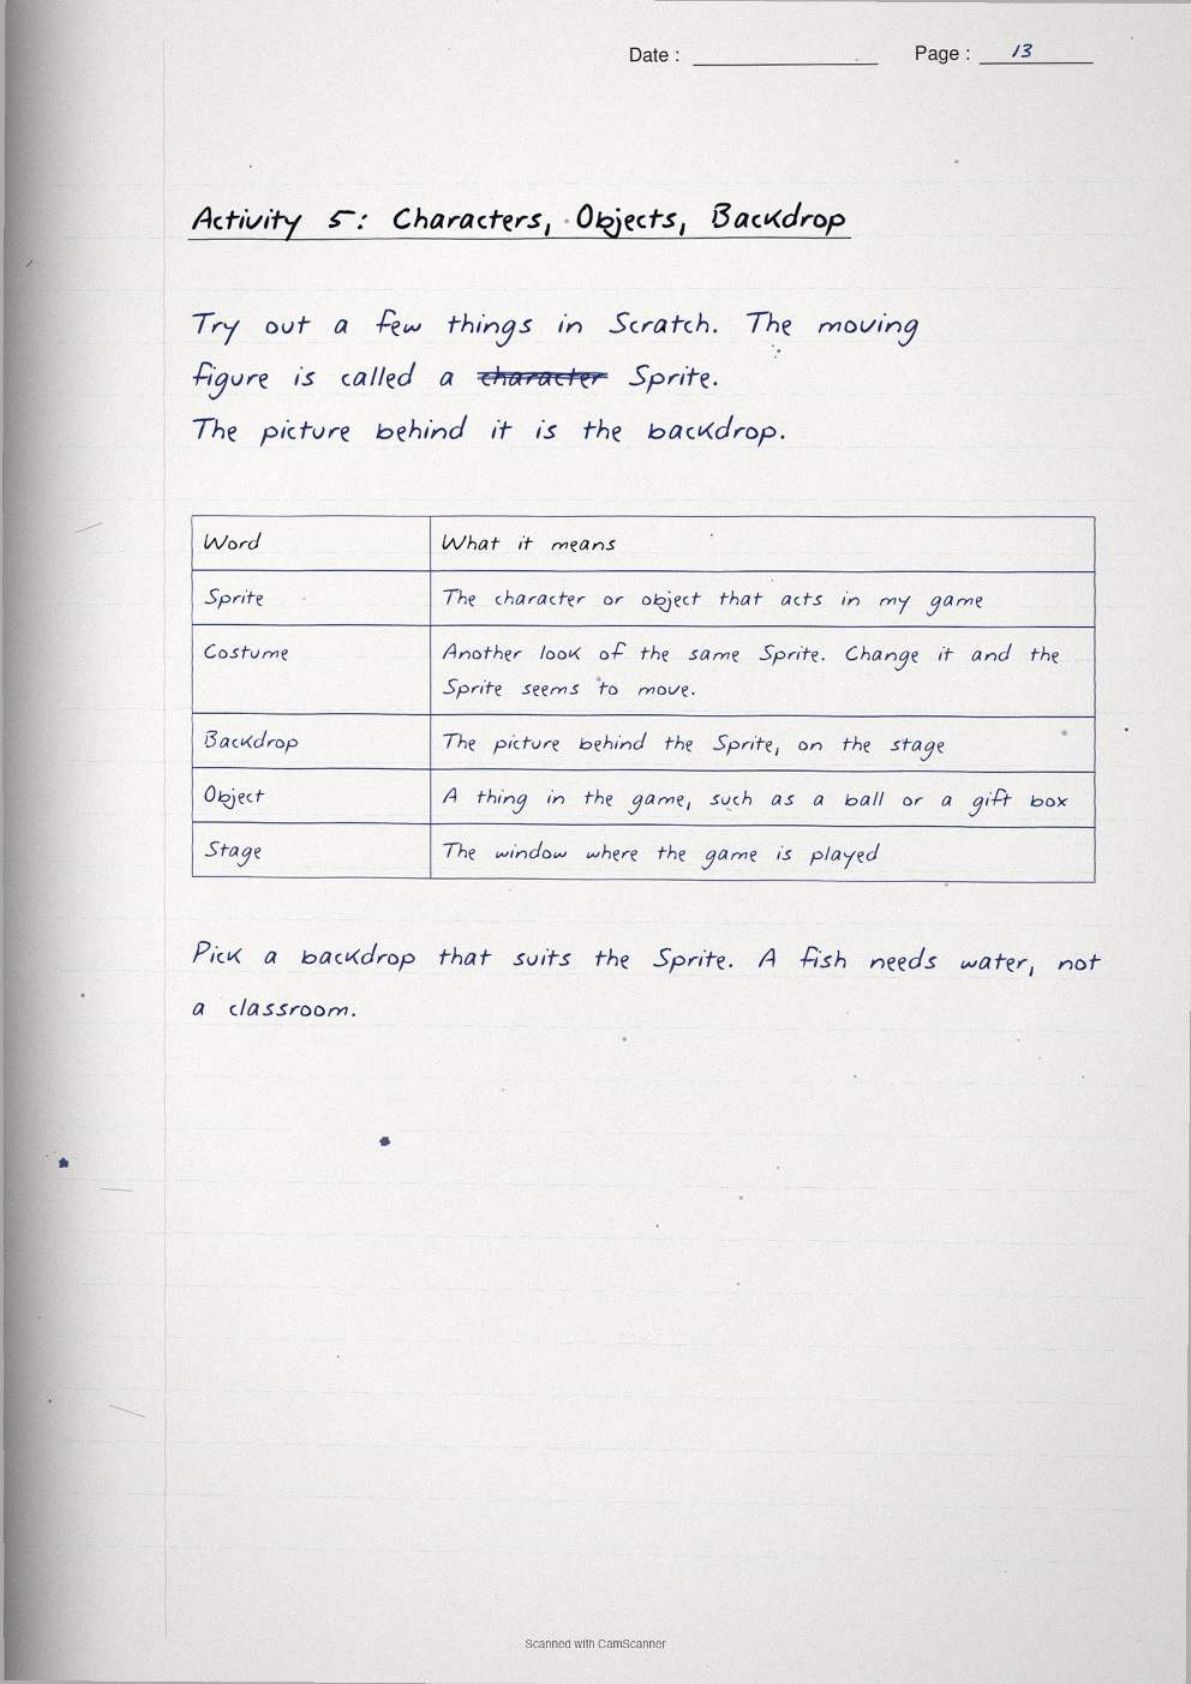
Activity 5: Sprite, Costume, Backdrop and Object Explained for Class 6
This activity introduces the five words the rest of the project depends on. Learn the words first and the software second. If these five words are clear, every later activity becomes easy.
| Word | What it means |
|---|---|
| Sprite | The character or object that acts in the game, such as the Scratch cat |
| Costume | Another look of the same Sprite. Change the costume quickly and the Sprite seems to move |
| Backdrop | The picture behind the Sprite, on the stage |
| Object | A thing in the game, such as a ball or a gift box |
| Stage | The window where the game is played |
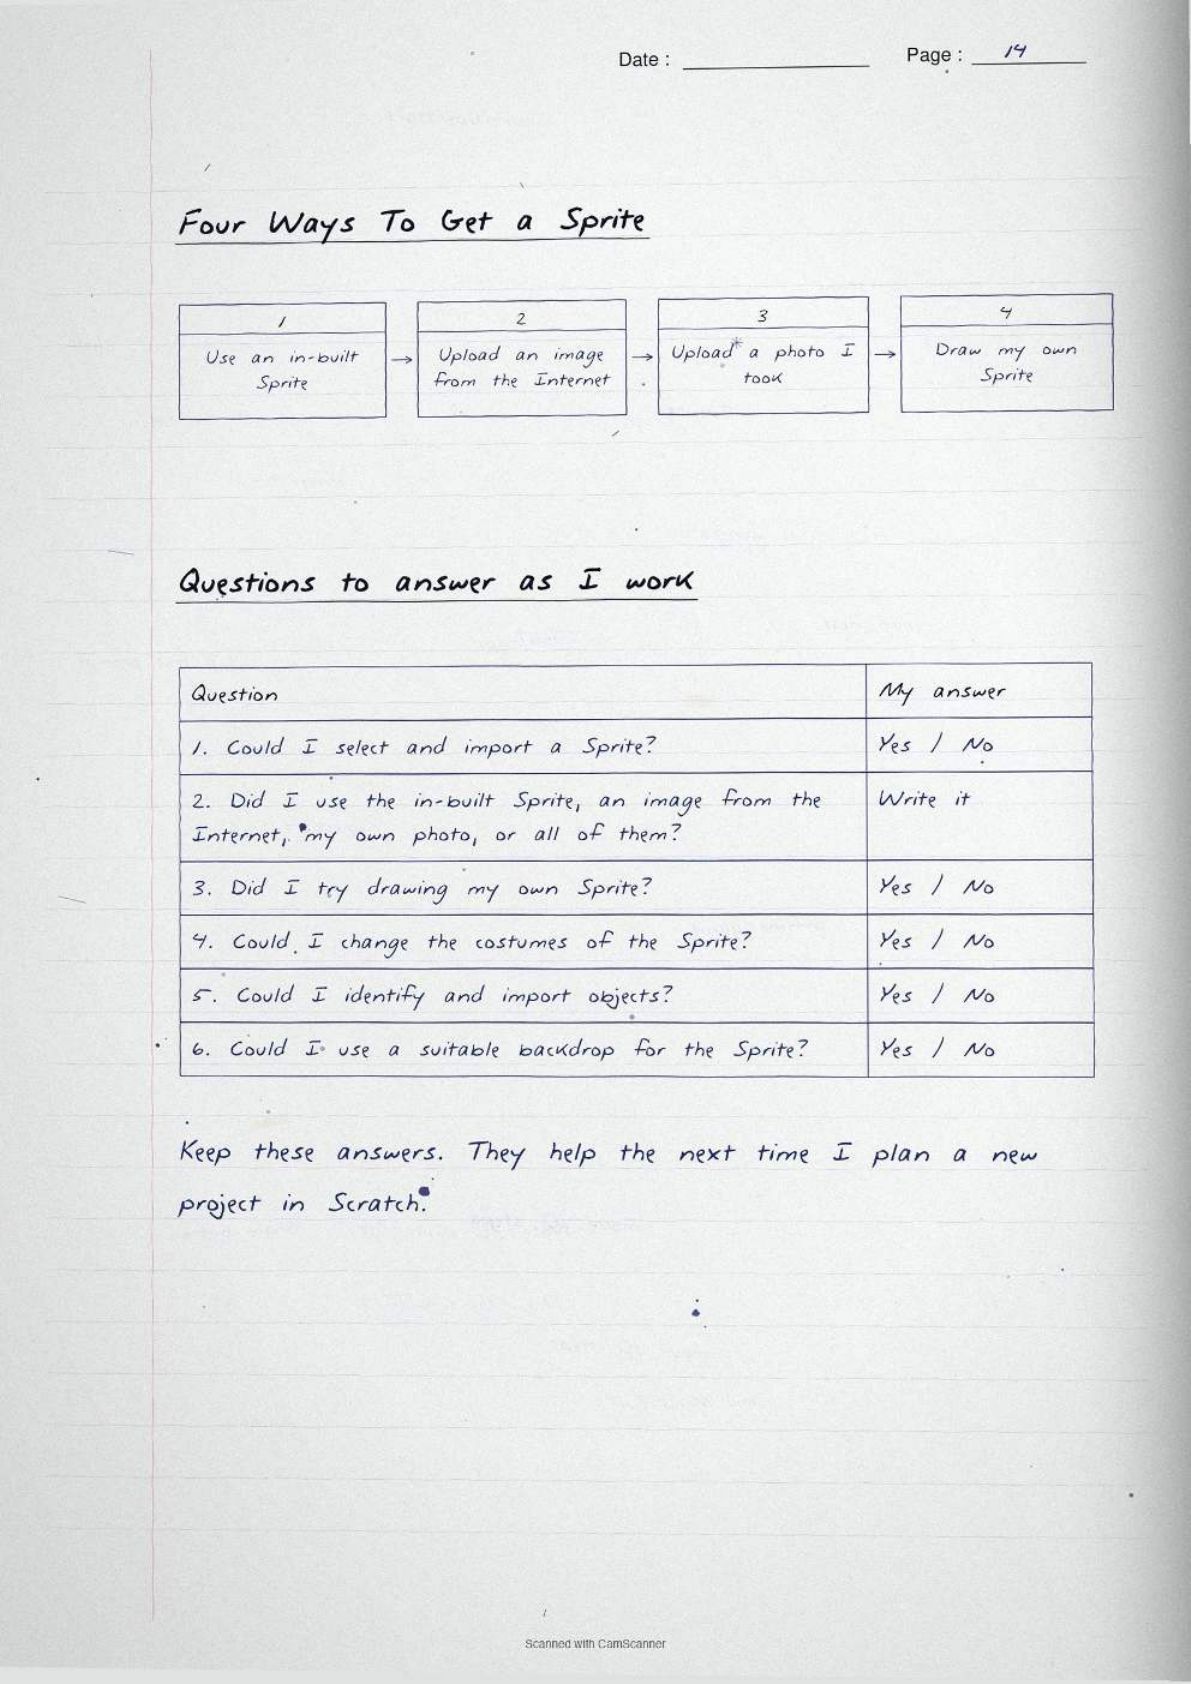
The book asks whether you were able to select and import a Sprite, whether you used the in-built Sprite or an image from the internet or your own photo, whether you tried drawing your own Sprite, whether you changed the costume, and whether you chose a suitable backdrop.
Those questions hide the four ways of getting a Sprite, which is a favourite short answer question.
- Use an in-built Sprite from the Scratch library.
- Upload an image from the internet.
- Upload a photo you took yourself.
- Draw your own Sprite in the paint editor.
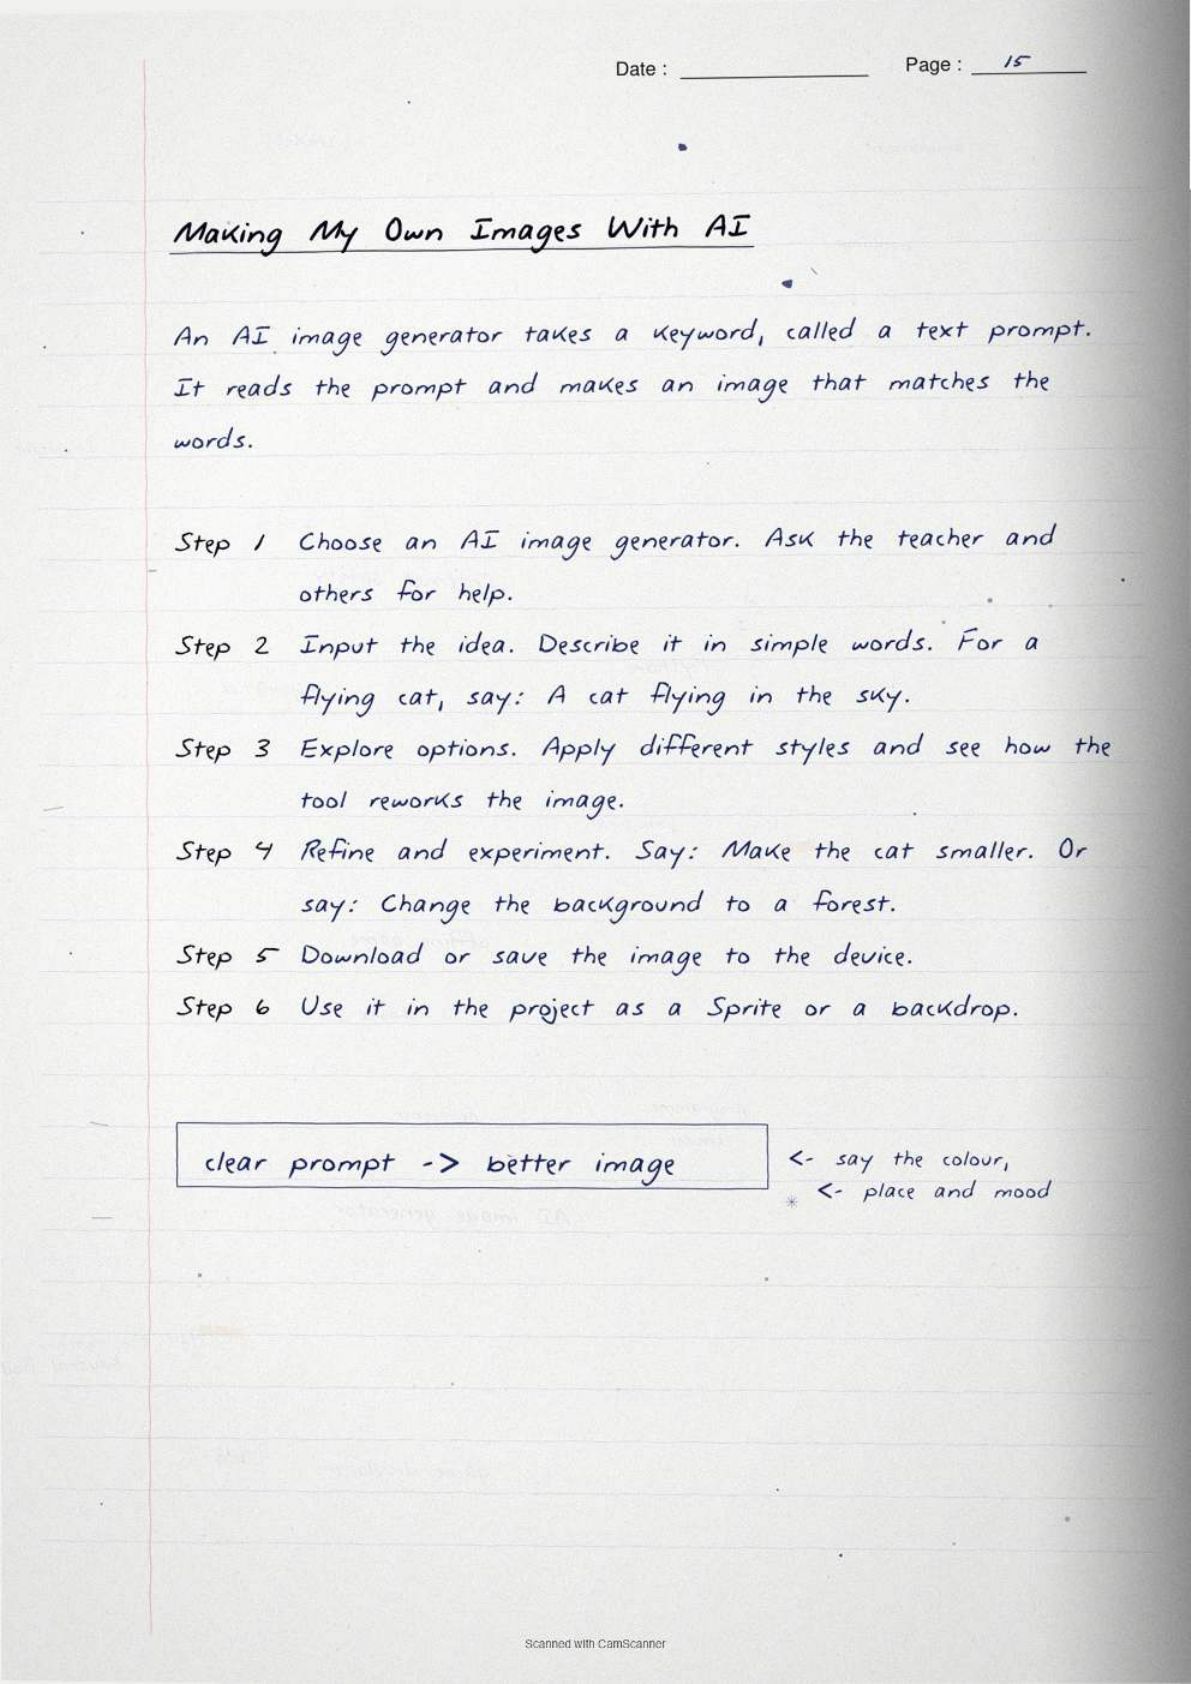
The chapter adds a fifth route in its own box. An AI image generator takes a keyword, called a text prompt, and creates an image matching that description.
- Choose an AI image generator with your teacher's help.
- Input your idea in simple words, such as "a cat flying in the sky".
- Explore options by applying different styles.
- Refine and experiment with instructions such as "make the cat smaller".
- Download or save the image, then use it as a Sprite or a backdrop.
Activity 6: The Eight Scratch Block Groups Every Class 6 Student Must Know
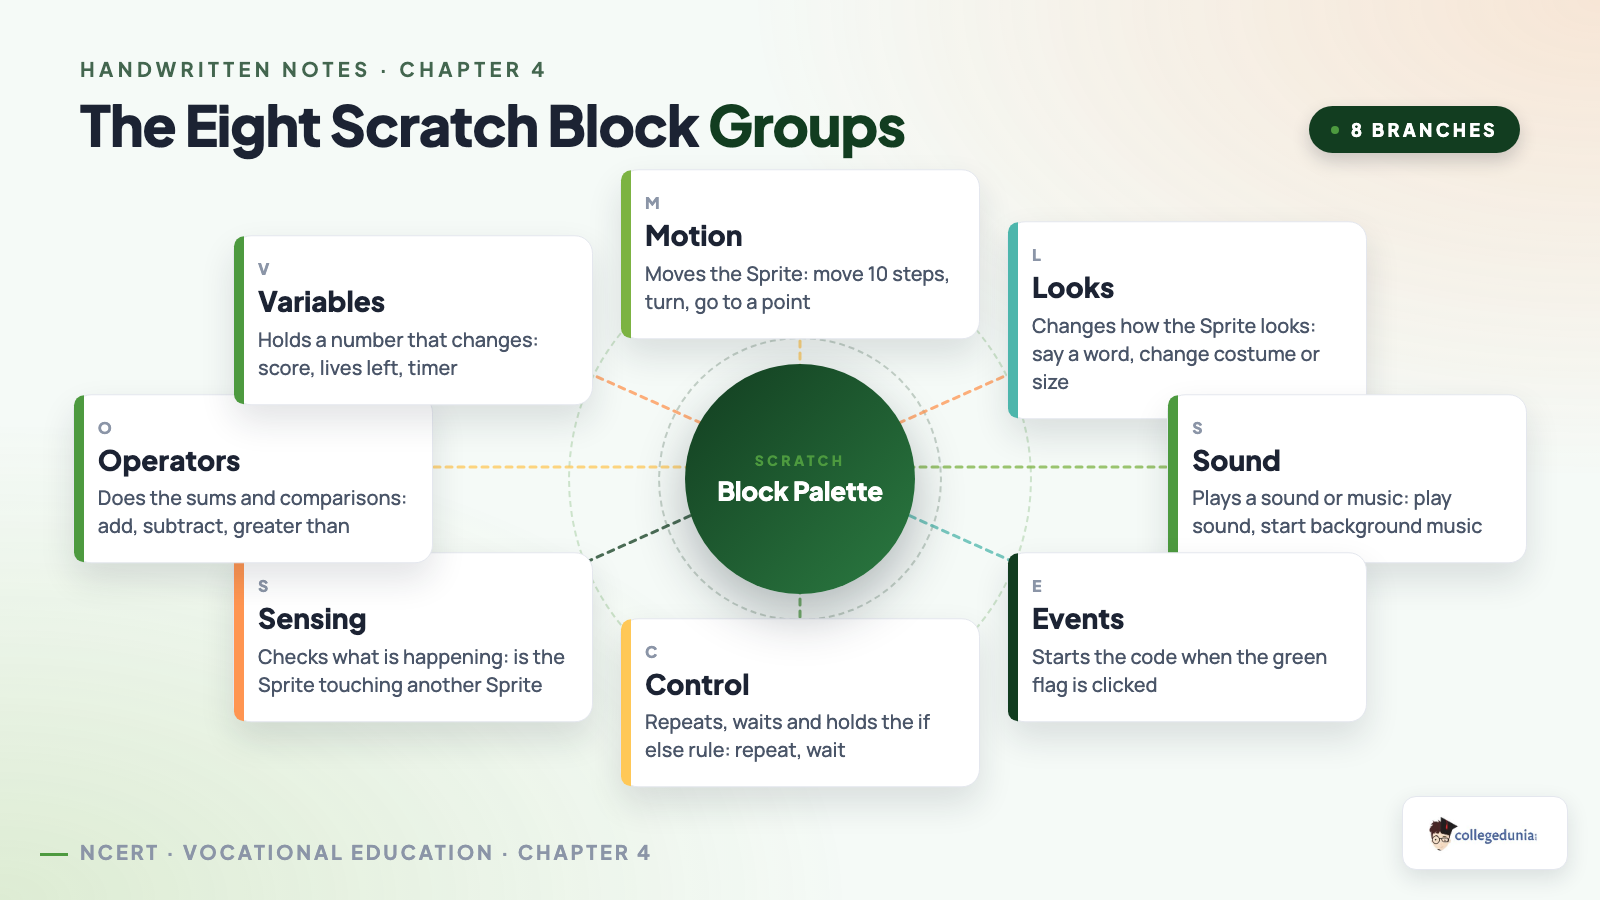
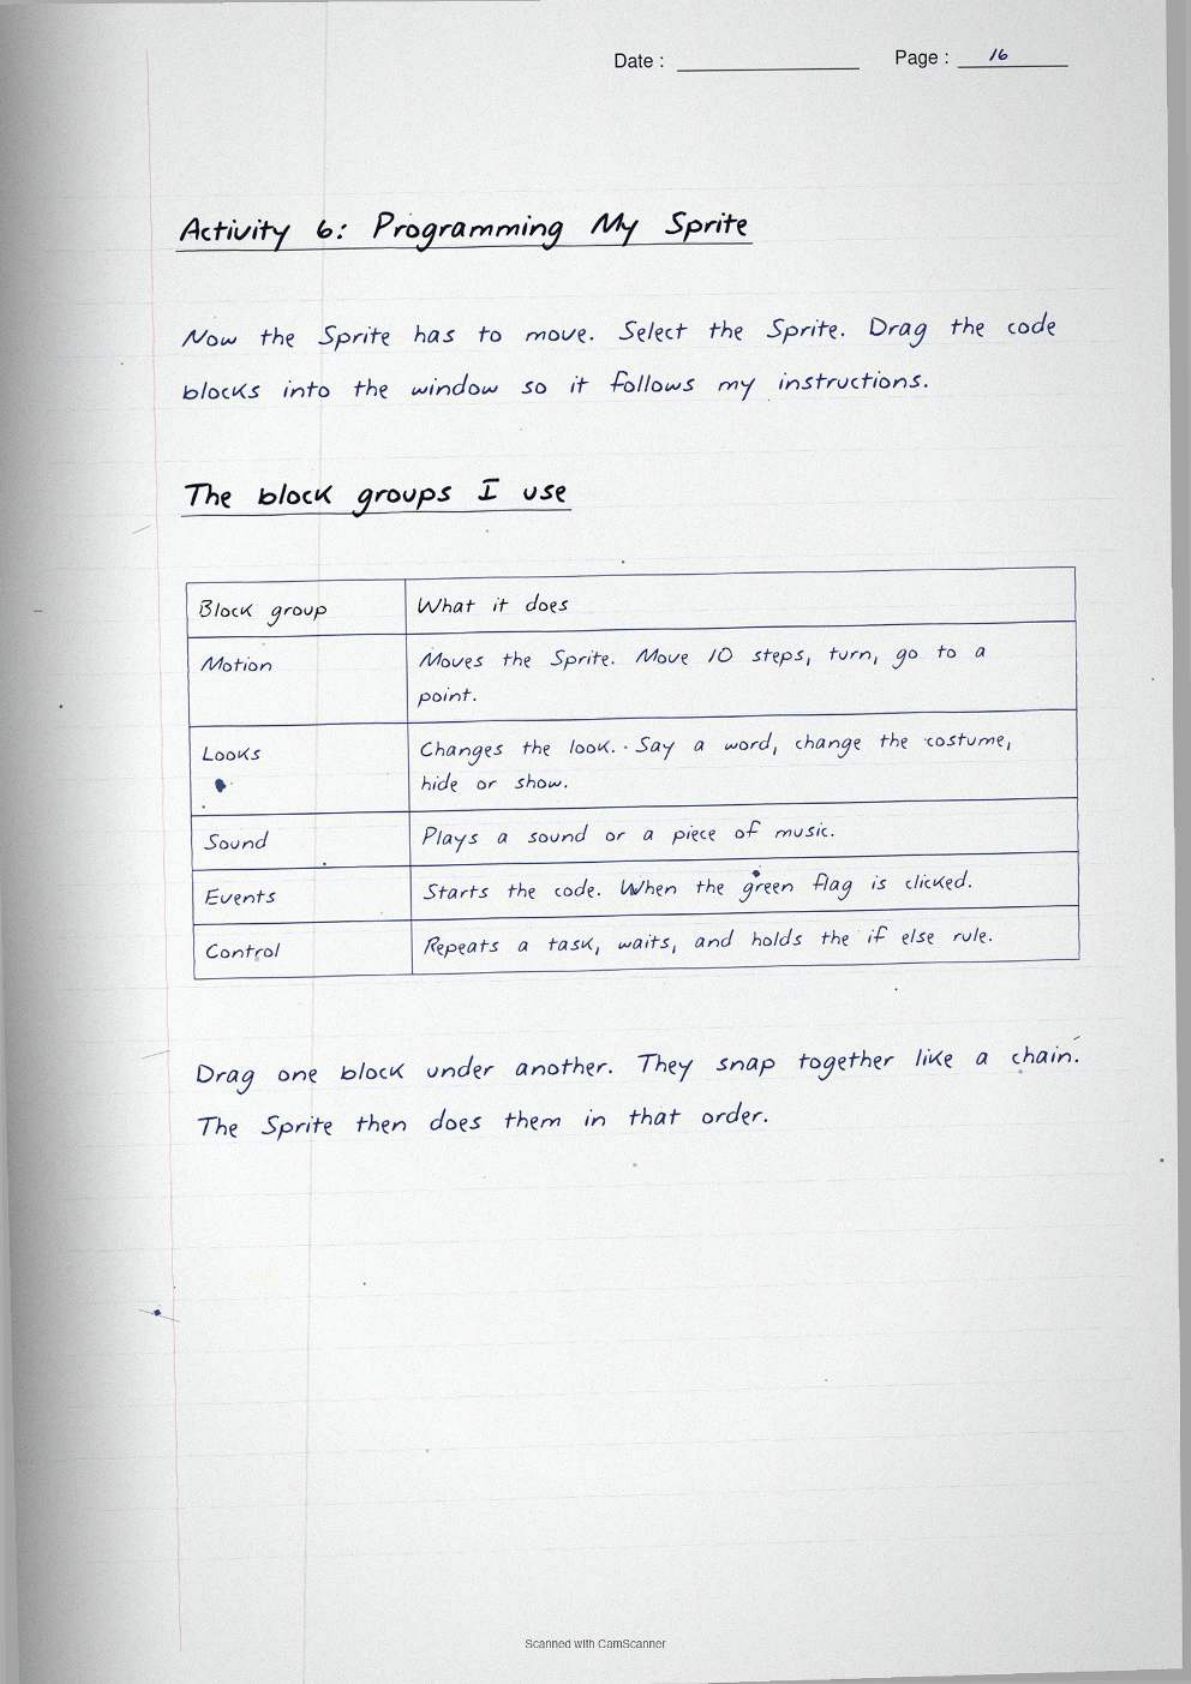
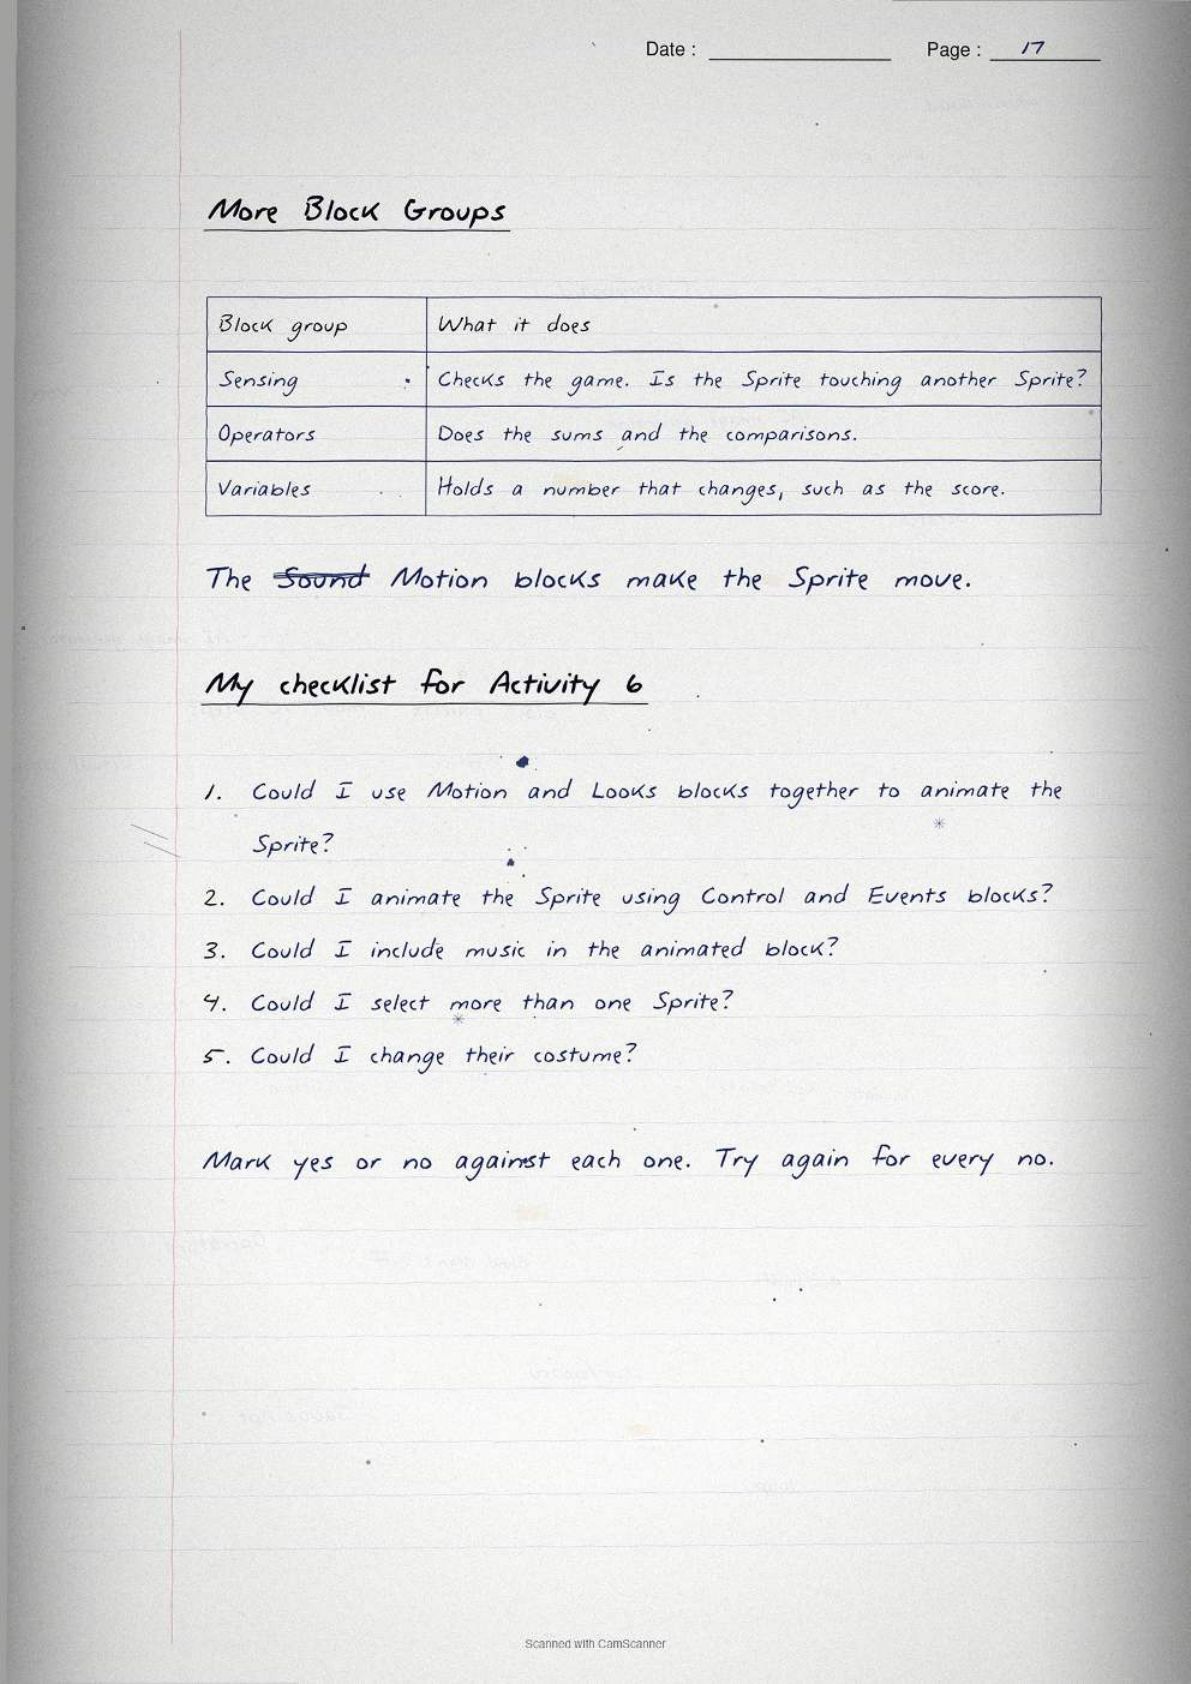
This is the section the student survey flagged as the hardest, and it is the heart of the chapter. Select your Sprite, drag blocks from the palette into the code area, and the Sprite follows your instructions. Each block group does one kind of job.
| Block group | What it does | Example block |
|---|---|---|
| Motion | Moves the Sprite | move 10 steps, turn, go to a point |
| Looks | Changes how the Sprite looks | say a word, change the costume, change the size |
| Sound | Plays a sound or a piece of music | play sound, start the background music |
| Events | Starts the code | when the green flag is clicked |
| Control | Repeats a task, waits, and holds the if else rule | repeat, wait, if else |
| Sensing | Checks what is happening in the game | is the Sprite touching another Sprite |
| Operators | Does the sums and the comparisons | add, subtract, greater than |
| Variables | Holds a number that changes | score, lives left, timer |
The notebook carries a memory line for the order of the eight groups: My Late Sister Eats Cold Soup Or Vegetables, which gives Motion, Looks, Sound, Events, Control, Sensing, Operators, Variables.
The five checklist questions for this activity ask whether you could animate the Sprite with Motion and Looks blocks together, animate it with Control and Events blocks, include music in the animated block, select more than one Sprite, and change their costumes. Mark yes or no against each, then try again for every no.
Activity 7: Making an Animated Birthday Card in Scratch Step by Step
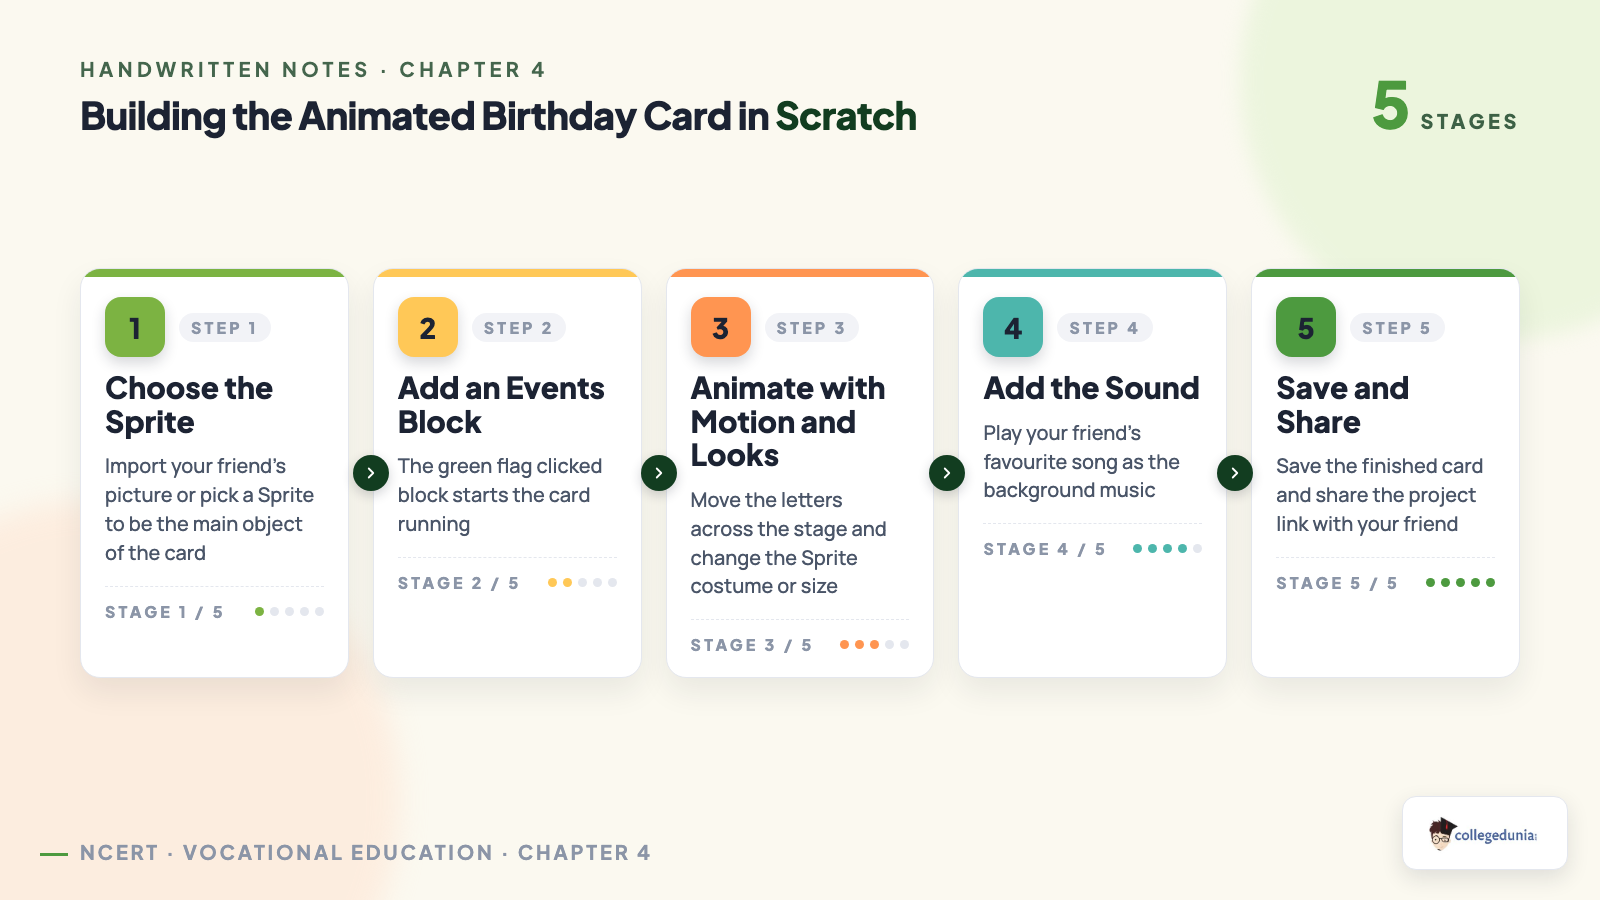
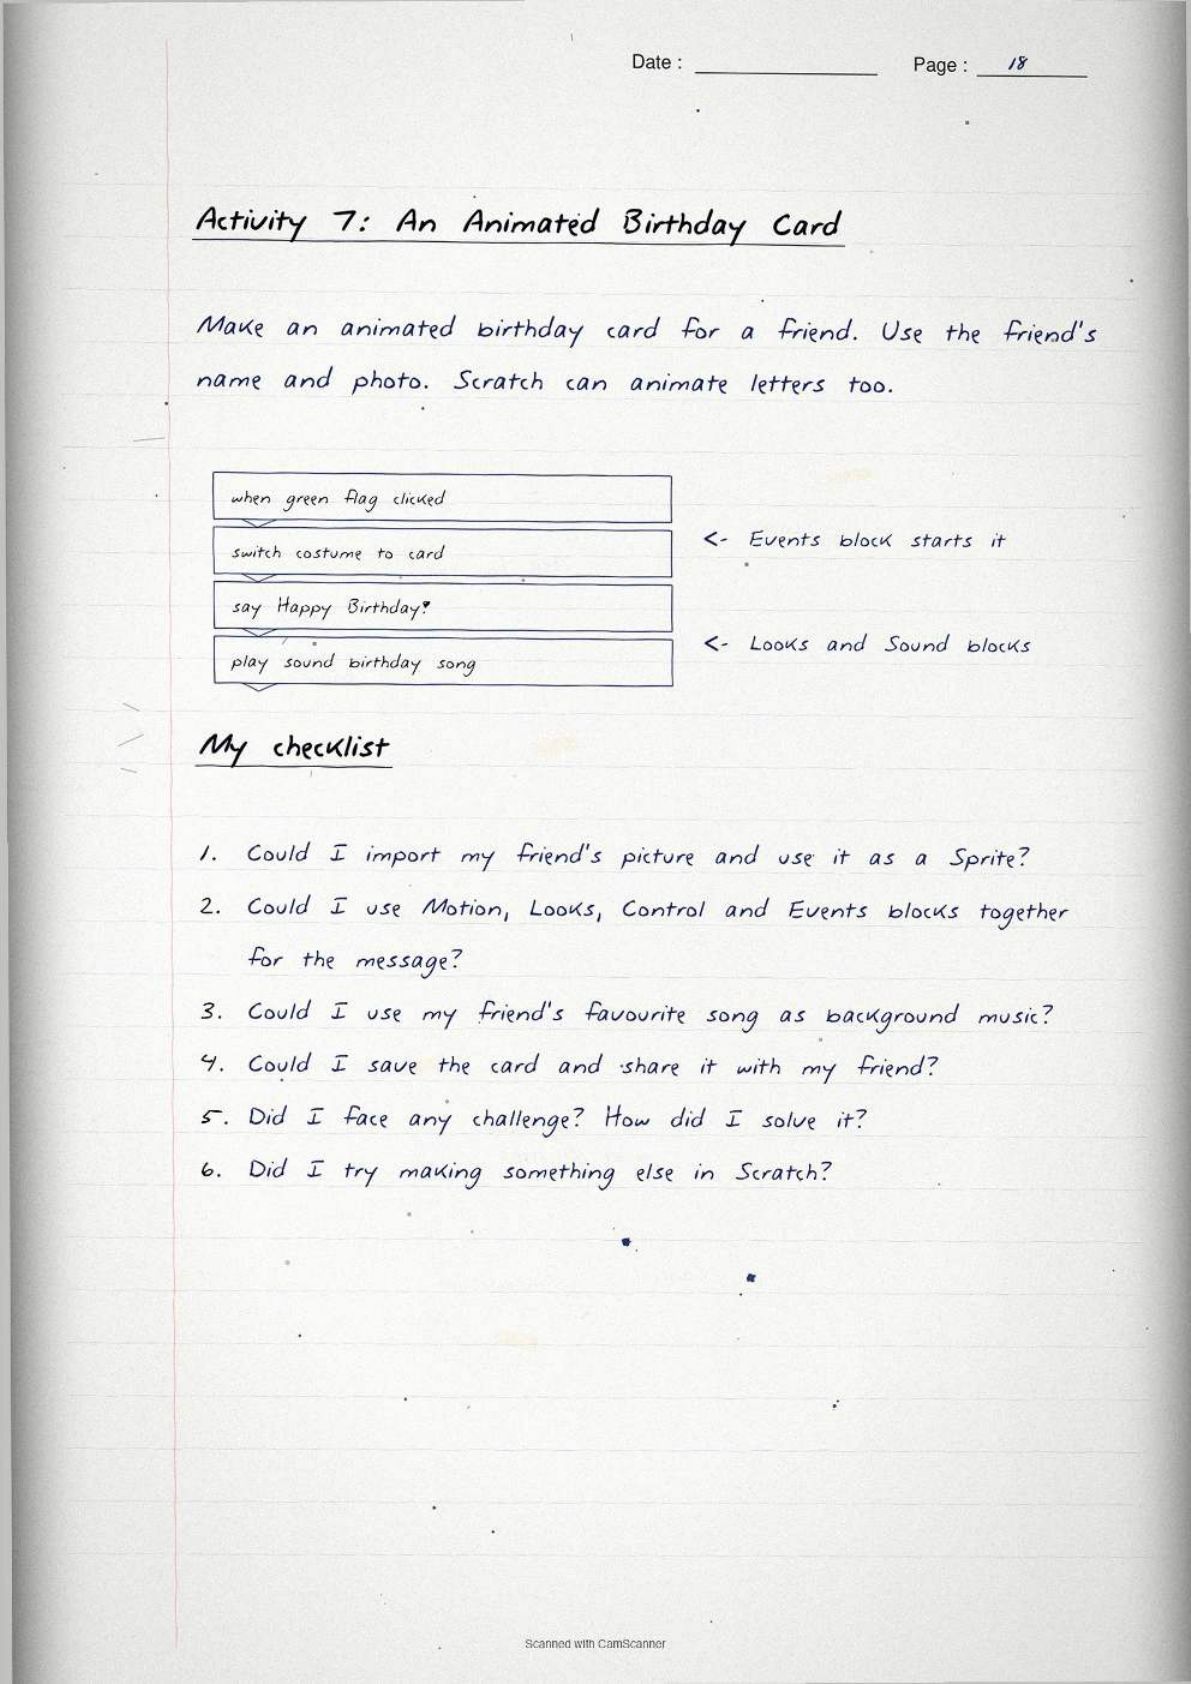
Activity 7 is the animation half of the project. You make an animated birthday card for a friend, using their name or their picture. Figure 4.10 shows animated letters moving on the Scratch stage.
The card needs three block groups working together, which is exactly what the question asks you to name.
- An Events block starts the card when the green flag is clicked.
- Motion and Looks blocks move the letters and change the Sprite.
- Sound blocks add your friend's favourite song as background music.
Six questions follow the activity. Could you import your friend's picture and use it as a Sprite? Could you use Motion, Looks, Control and Events blocks together to make the animated message? Could you use their favourite song as background music? Could you save the card and share it? Did you face any challenge, and how did you solve it? Did you try making anything else in Scratch?
Activity 8: What a Storyboard Is and How the Sonu Storyboard Card Is Filled
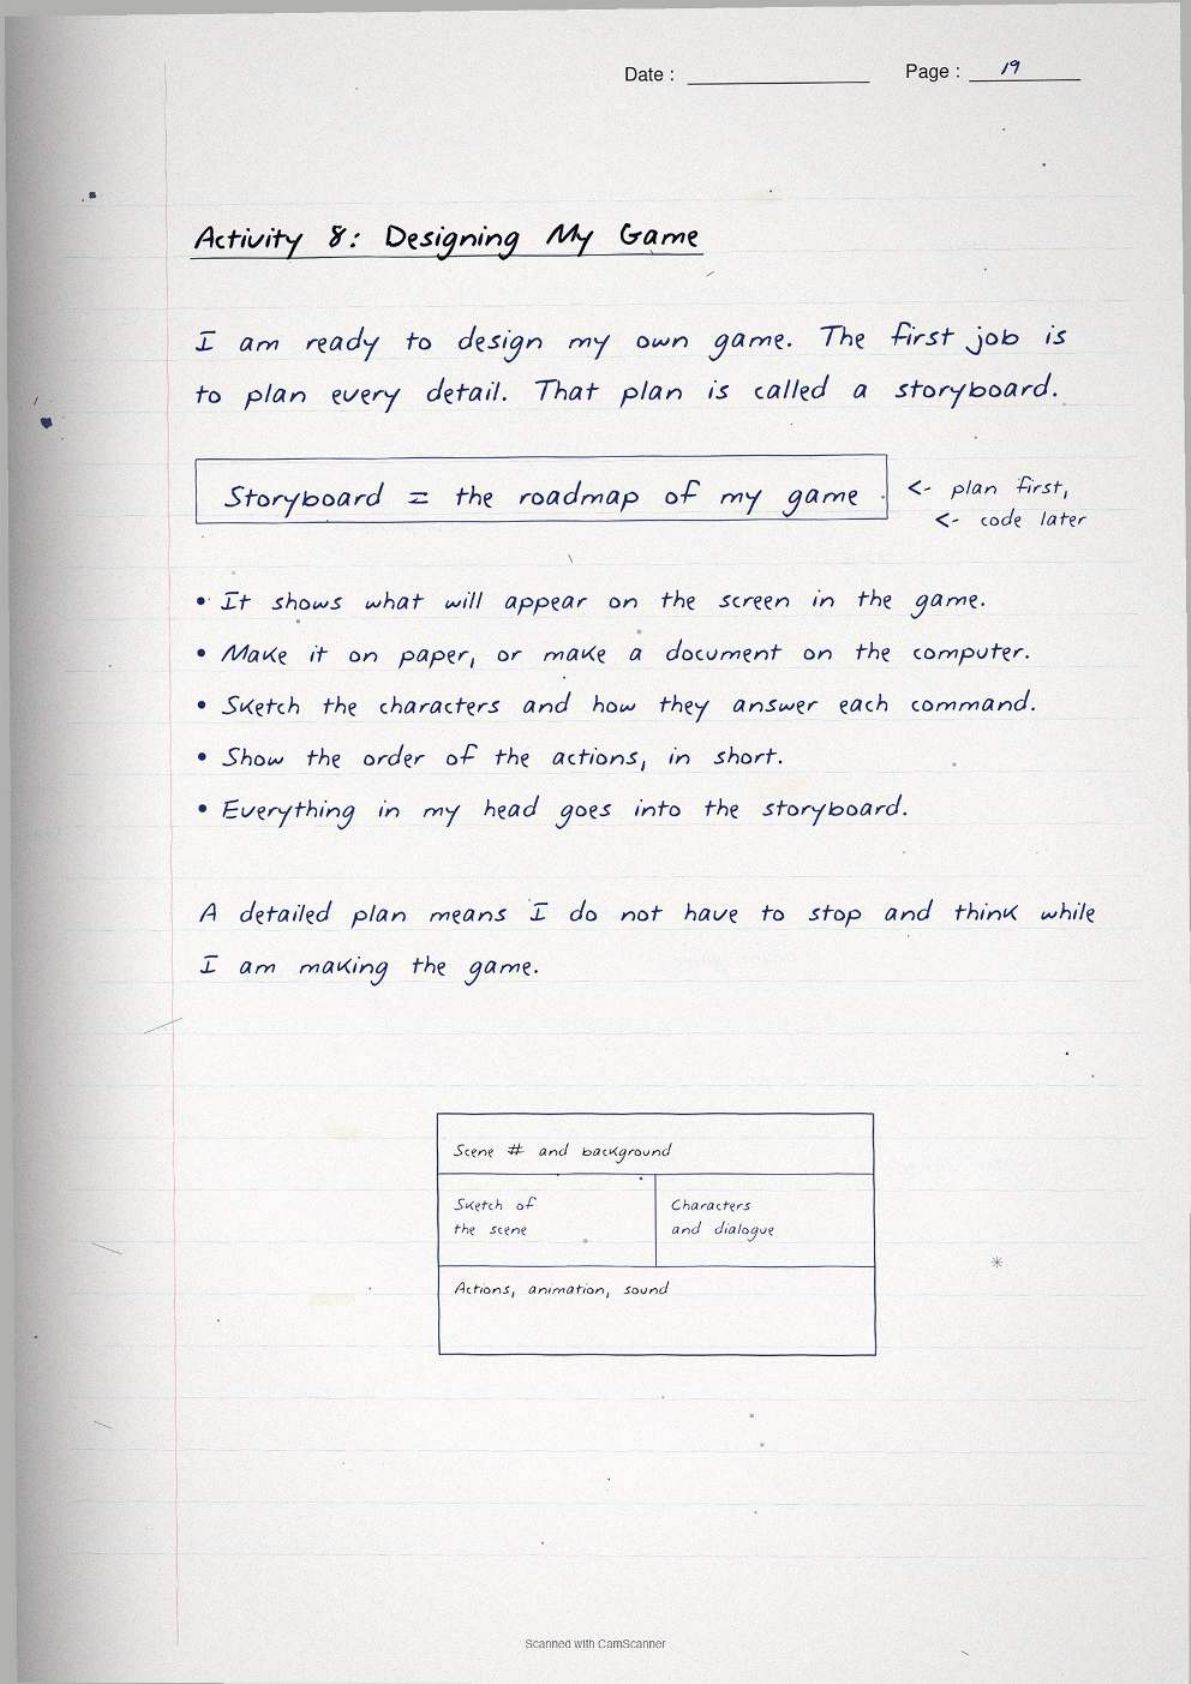
Before you code the game, you plan it. That plan is called a storyboard, and the definition is asked almost every time.
A storyboard helps in planning what will be shown on the screen during a game or animation. It is like a roadmap. You can make it on paper or as a document on the computer. Sketch the characters, write how they respond to commands, and show the sequence of actions in short. Everything in your head goes into the storyboard, so you do not have to stop and think while you are building the game.
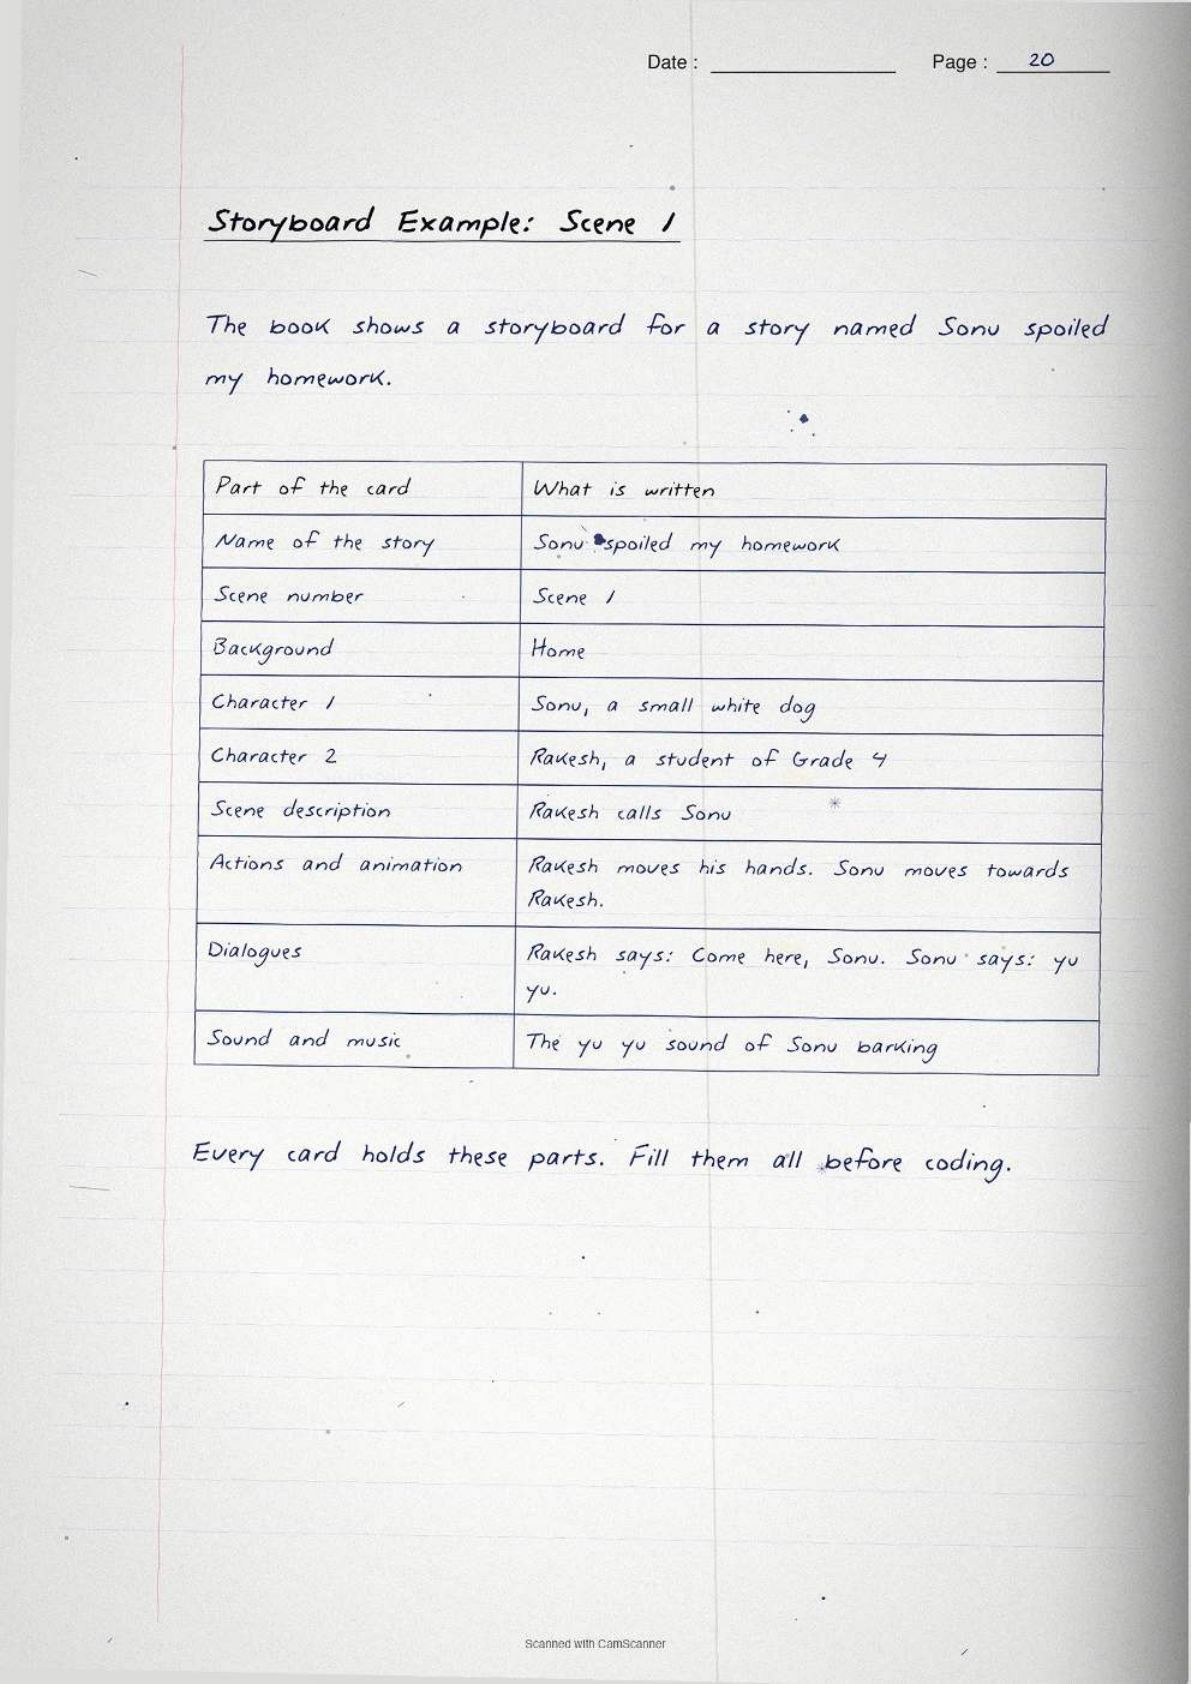
Figure 4.11 shows a worked storyboard for a story called "Sonu spoiled my homework". Learn the parts of the card, not the story.
| Part of the card | What is written in the example |
|---|---|
| Name of the story | Sonu spoiled my homework |
| Scene number | Scene 1 |
| Background | Home |
| Characters | Sonu, a small white dog. Rakesh, a student of Grade 4 |
| Scene description | Rakesh calls Sonu |
| Actions and animation | Rakesh moves his hands. Sonu moves towards Rakesh |
| Dialogues | Rakesh says "Come here, Sonu". Sonu says "yu yu" |
| Sound and music | The yu yu sound of Sonu barking |
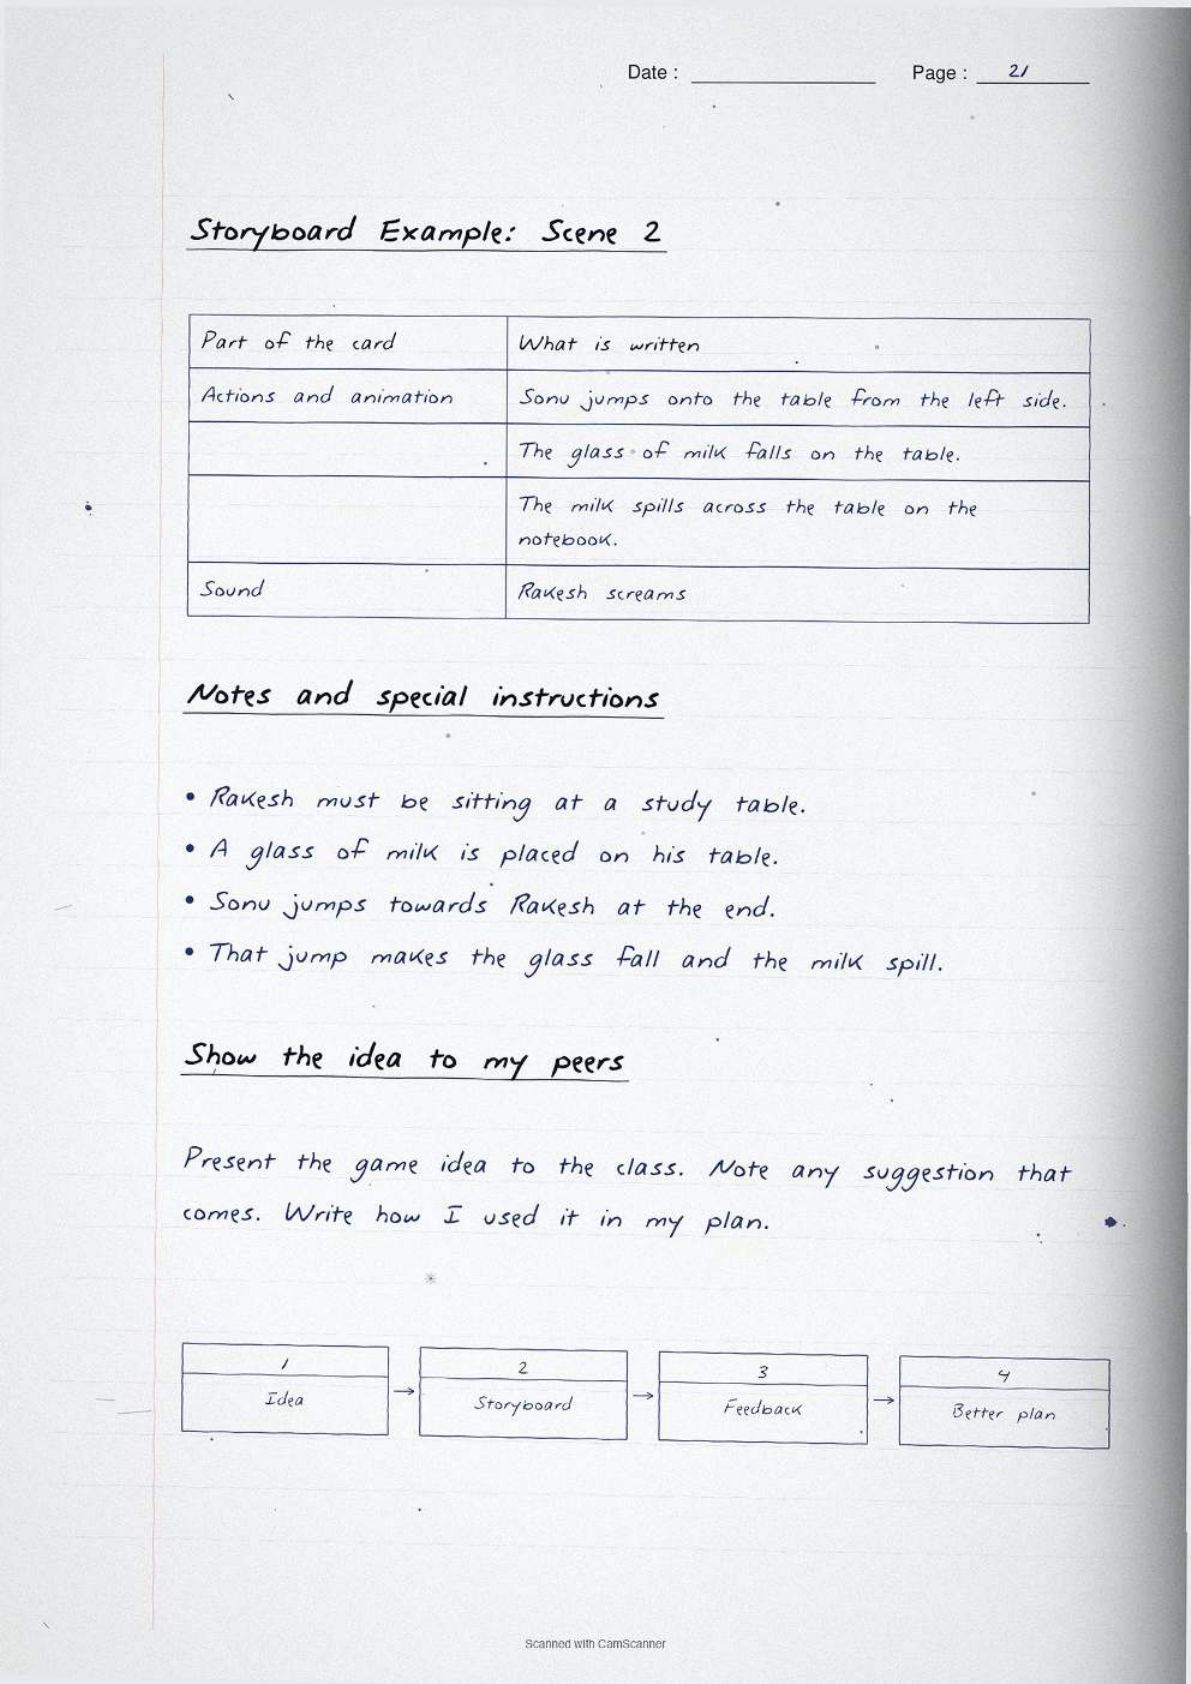
Scene 2 continues the same story. Sonu jumps onto the table from the left side, the glass of milk falls, the milk spills across the table onto the notebook, and Rakesh screams. The notes section adds the special instructions: Rakesh must be sitting at a study table with a glass of milk placed on it.
Once the storyboard is ready, present the game idea to your peers. Note any suggestion you received and write how you used it.
Activity 9 to Activity 11: Coding, Testing, Sharing and Explaining Your Game
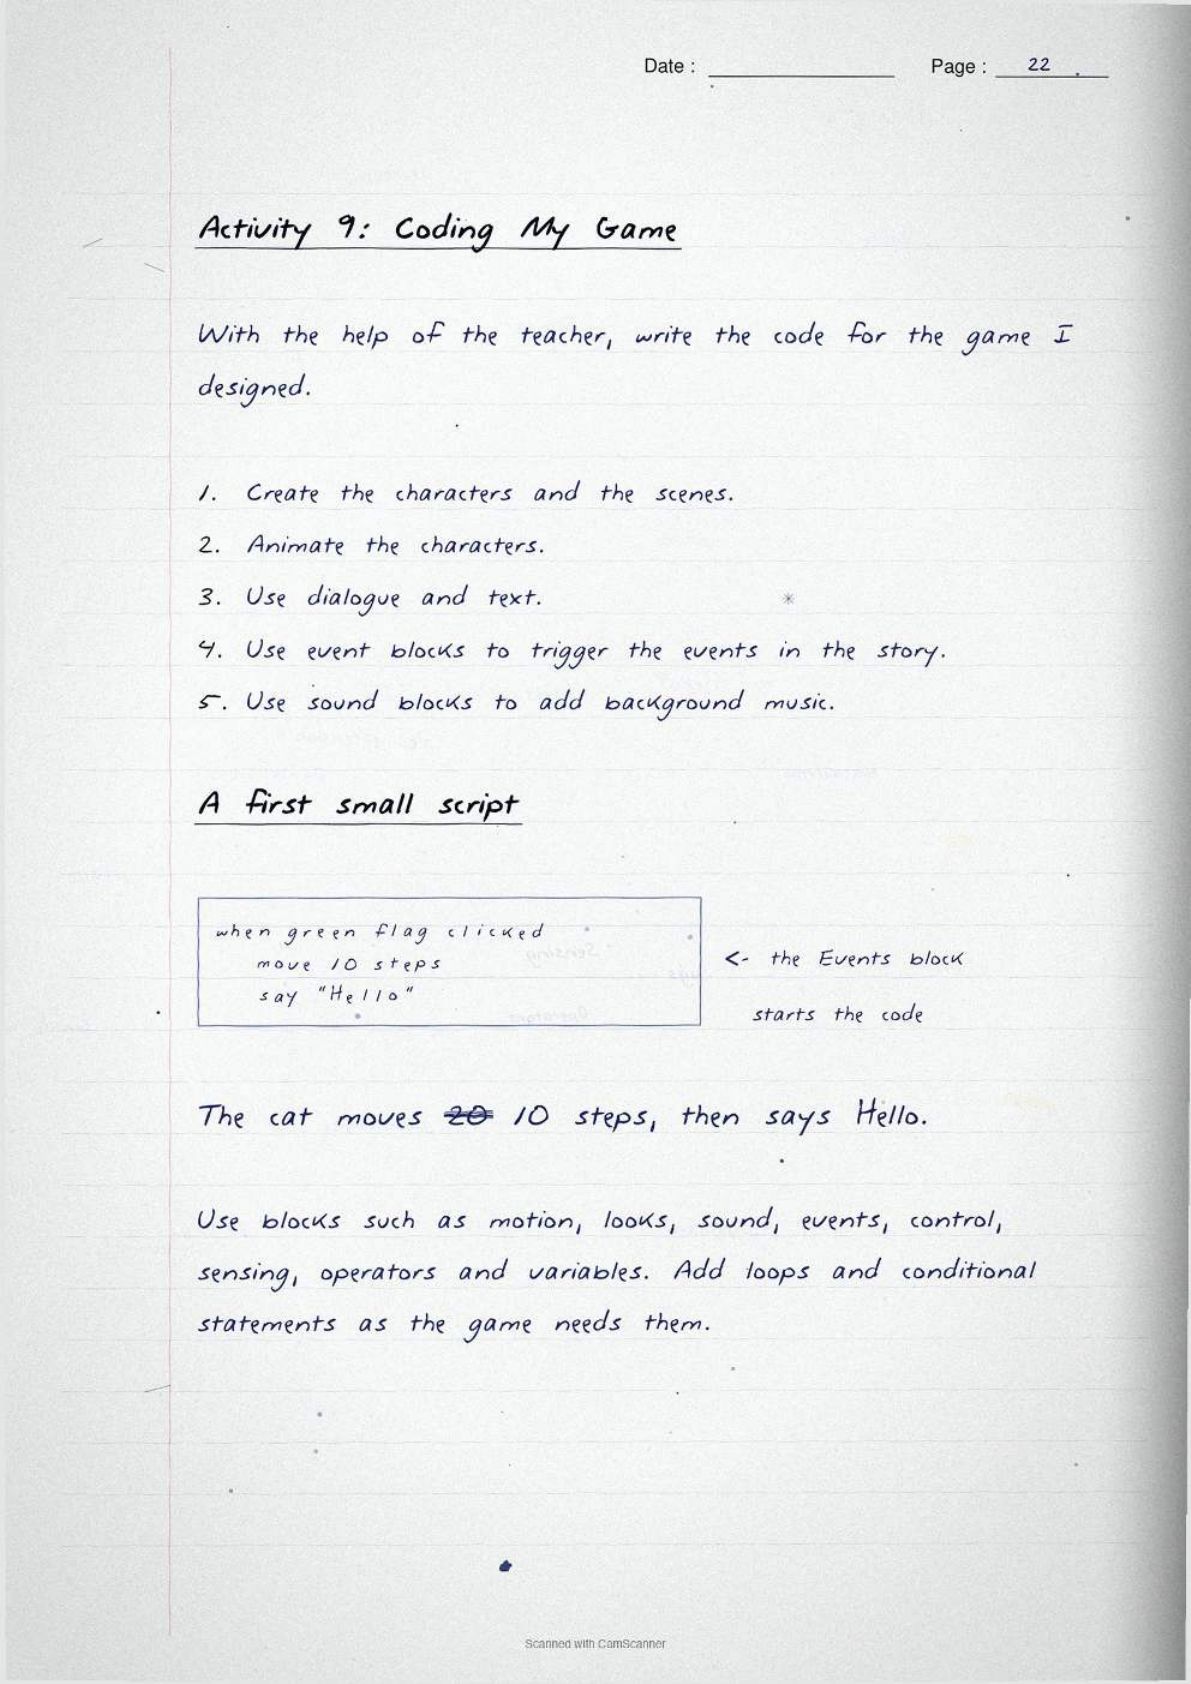
Activity 9 is where the game is actually coded, with help from your teacher. The book gives five coding jobs.
- Create the characters and scenes.
- Animate the characters.
- Use dialogue and text.
- Use Event blocks to trigger different events in the story.
- Use Sound blocks to add background music.
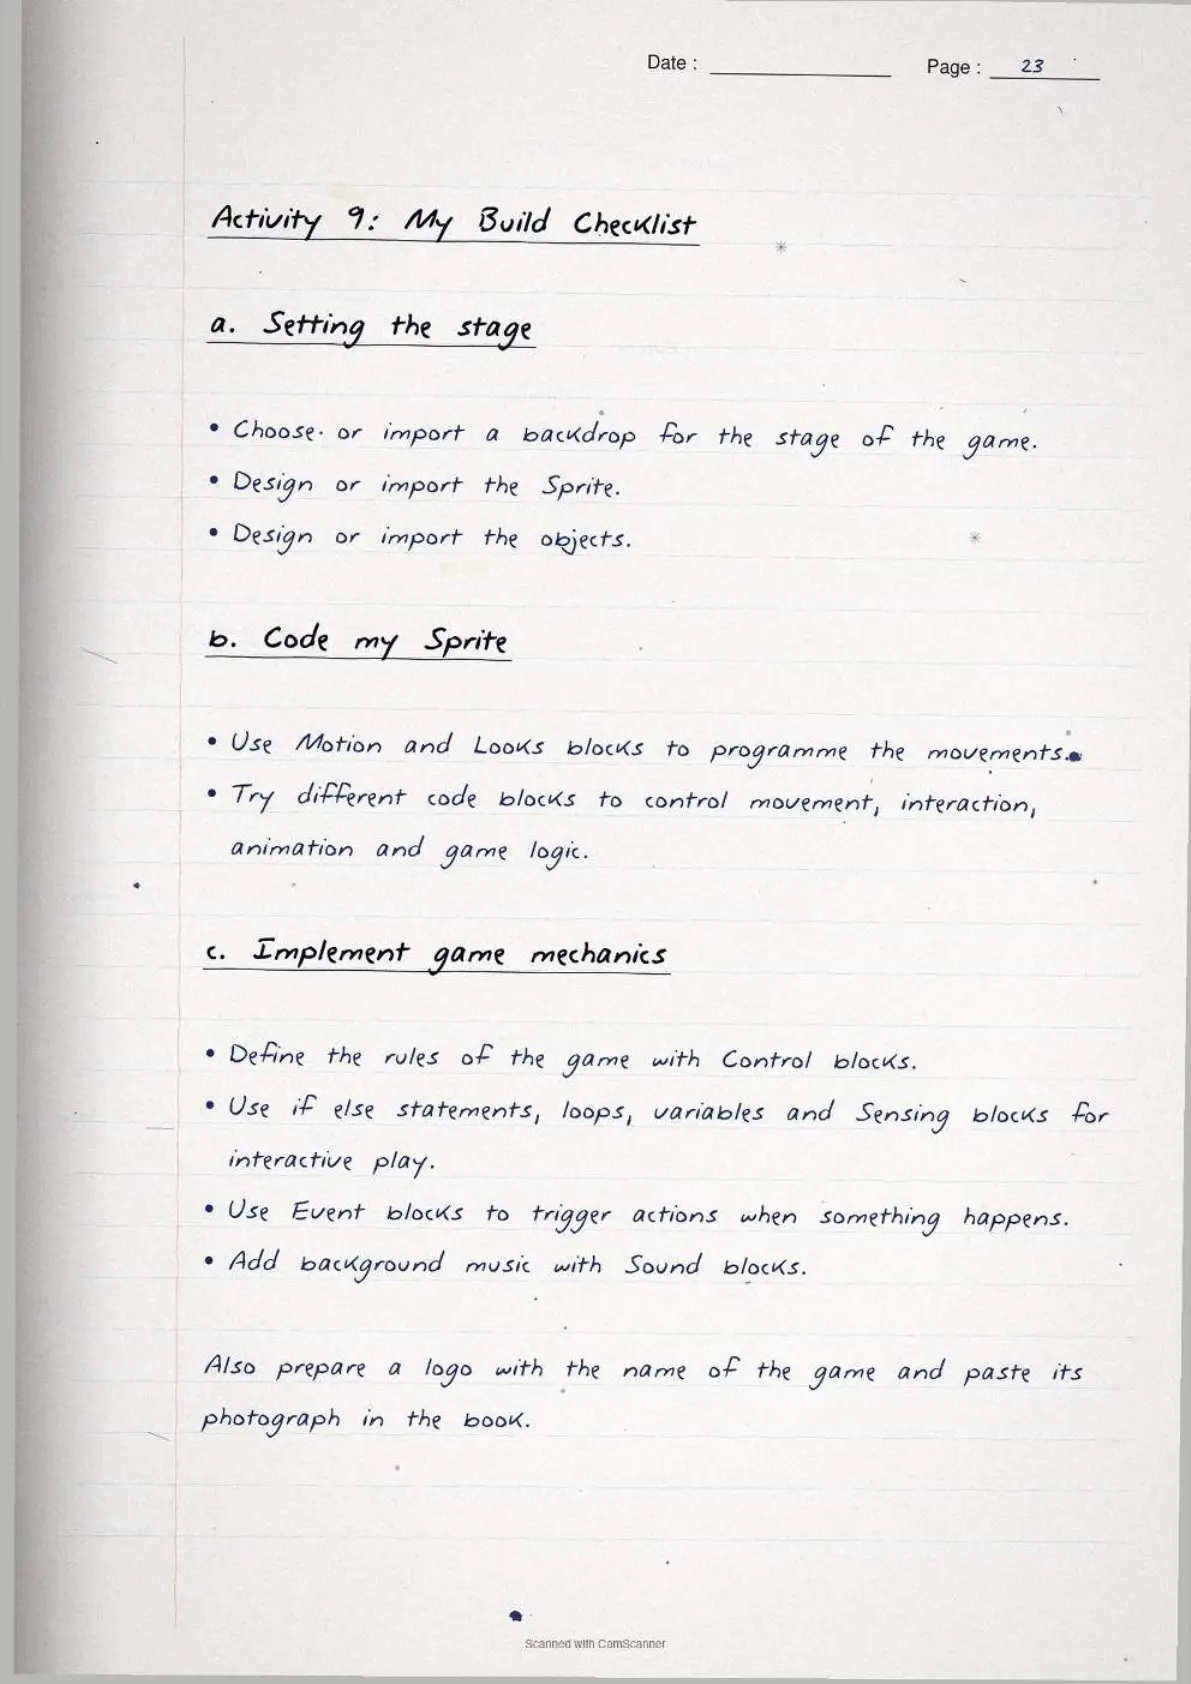
Figure 4.12 shows a first small script. In that code the cat moves 10 steps ahead and says "Hello" once you press start. The build checklist that follows is split into three parts, and it is the clearest summary of the whole project.
| Stage | What you have to do |
|---|---|
| Setting the stage | Choose or import a backdrop, then design or import the Sprite and the objects |
| Coding the Sprite | Use Motion and Looks blocks to programme the movements, then try other blocks to control movement, interaction, animation and game logic |
| Game mechanics | Define the rules with Control blocks. Use if else statements, loops, variables and Sensing blocks. Use Event blocks to trigger actions, and Sound blocks for music |
You also prepare a logo with the name of your game and paste its photograph in the space given.
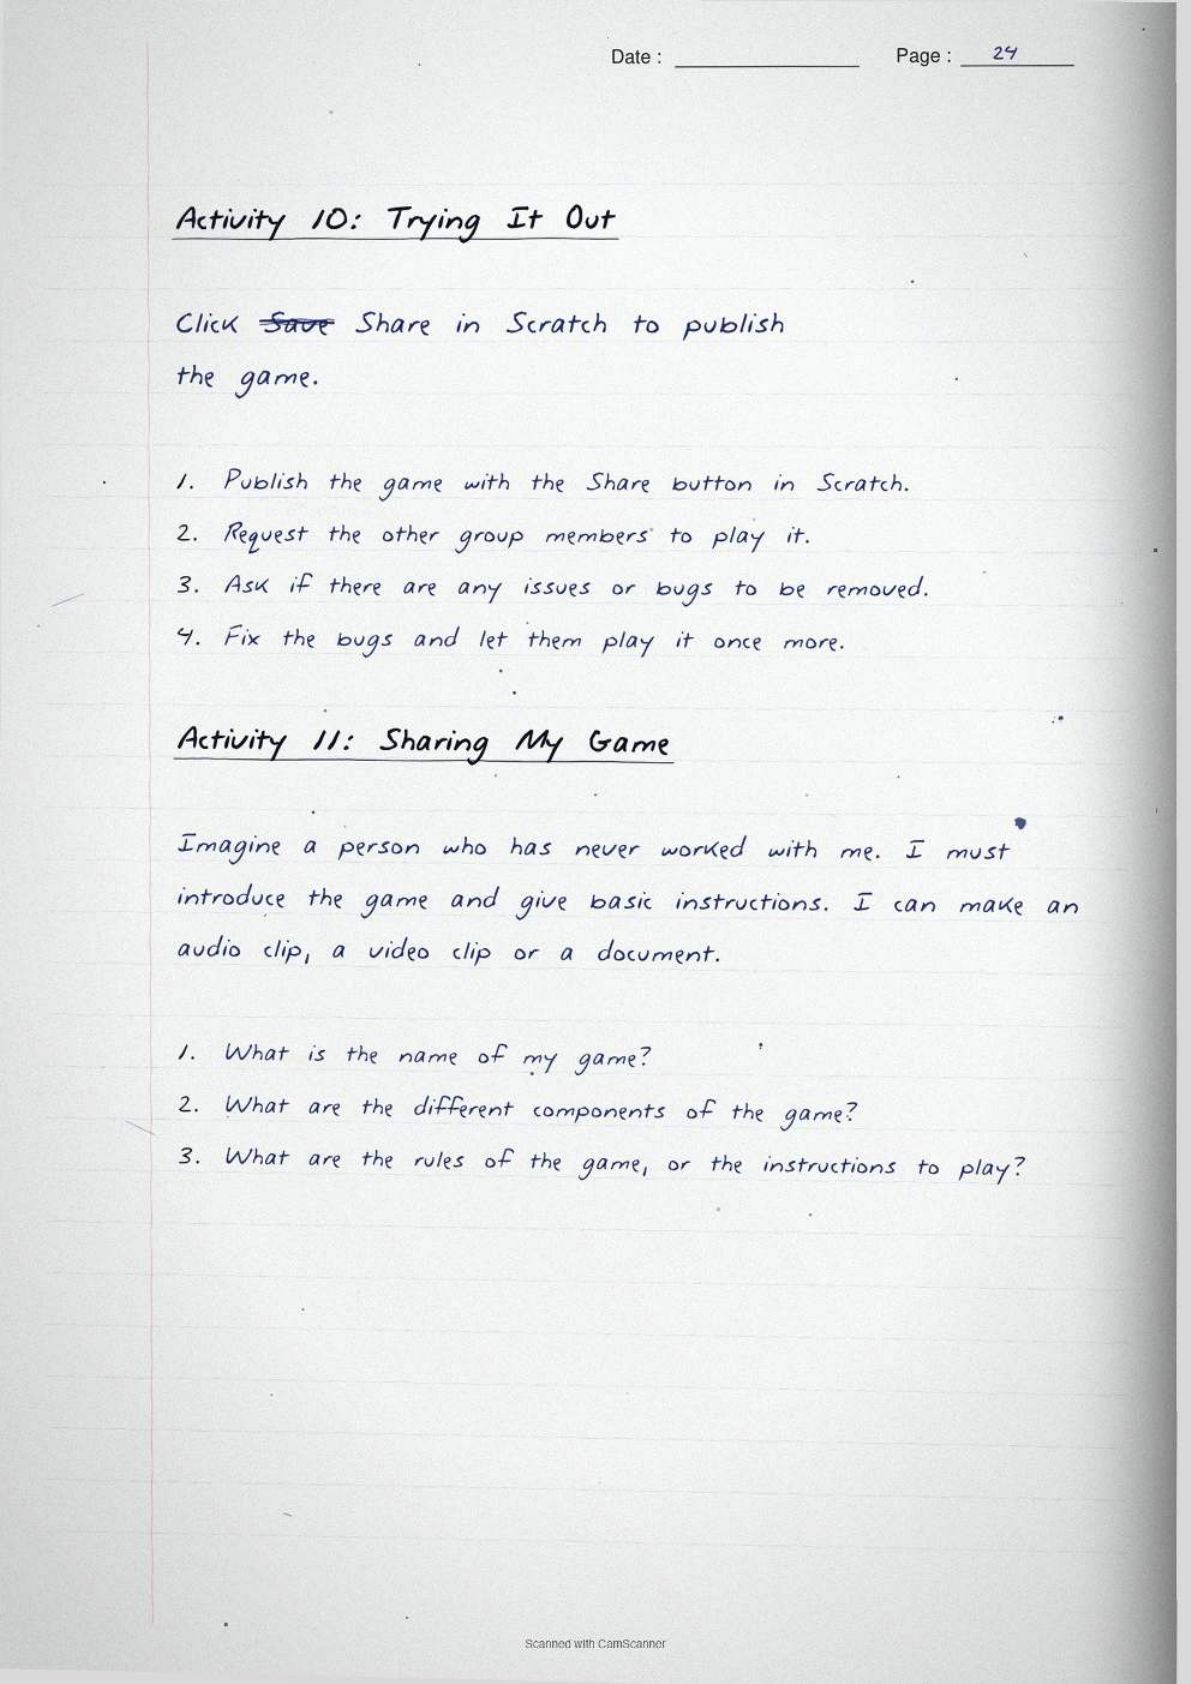
Activity 10 is testing. Publish the game by clicking the Share button in Scratch, ask the other group members to play it, and check whether there are any issues or bugs that need to be removed. Fix the bugs and let them play once more.
Activity 11 is sharing. Imagine someone who has never worked with you is about to play the game. You introduce it with an audio clip, a video clip or a document, answering three questions: what is the name of the game, what are its different components, and what are the rules or instructions to play.
The chapter closes by asking what you learned from others, and by naming the jobs linked to this project: programmer, software developer, game developer and 3D animator.
Common Mistakes Students Make in the Animation and Games Chapter
Five slips that cost easy marks in the Class 6 project file and class test:
- Mixing up Sprite and backdrop. The Sprite is the character that acts. The backdrop is the picture behind it.
- Calling a costume a different Sprite. A costume is another look of the same Sprite. Changing costumes quickly is what makes it seem to move.
- Swapping Control and Events. Events start the code when something happens. Control repeats, waits and holds the if else rule.
- Writing that Scratch is a normal programming language. It is a visual programming language, because instructions are clubbed into blocks you move around.
- Skipping the storyboard. The storyboard is the plan made before coding. Answers that jump straight to coding lose the planning mark.
Tick each slip off only after you have written the correct answer once. Students who did this said the block group question stopped costing them marks after two attempts.
Quick Recall Sheet: Every Scratch Word from the Animation and Games Chapter
This is the page to read the night before the class test and once again in the morning. Everything the chapter can ask sits in one place.
| Word | One-line meaning |
|---|---|
| Coding | Giving instructions to a computer or smartphone |
| Programme | A series of instructions given to a device |
| Programming language | The language used to communicate with a device, such as Javascript, Python or C++ |
| Visual programming language | A language whose instructions are clubbed into blocks, such as Scratch |
| Block | One instruction piece that snaps onto another to build a script |
| Sprite | The character or object that acts on the stage |
| Costume | Another look of the same Sprite |
| Backdrop | The picture behind the Sprite |
| Stage | The window where the game is played |
| Storyboard | The plan of what will appear on screen, made before coding |
| Bug | An issue in the game that stops it working smoothly |
| Share button | The Scratch button that publishes your game for others to play |
| Text prompt | The keyword given to an AI image generator to create an image |
| Extension | An add-on for Scratch, such as the Pen extension that draws shapes |
The notebook also carries a memory line for the order of work: Plan, Build, Code, Test, Share. Plan on paper before you touch the keyboard, and test after every block rather than at the end.
What the Animation and Games Class 6 Handwritten Notes PDF Contains
The file is a handwritten notebook, with sub-headings in colour and the block group tables boxed by hand. Nothing is typed, so it reads like a classmate's own notes.
- Pages 1 to 6: what the project asks for, coding and programmes, programming languages, and what Scratch is.
- Pages 7 to 12: the default Scratch window, the materials list, the internet safety table and the screen time rules.
- Pages 13 to 18: Activity 1 to Activity 4, the game model, the online game questions and the search prompts.
- Pages 19 to 24: Sprite, costume and backdrop, the four ways to get a Sprite, the AI image steps and all eight block groups.
- Pages 25 to 30: the birthday card, both storyboard cards, the build checklist, the mistake list and the summary with mnemonics.
How to Use the Animation and Games Handwritten Notes Most Effectively
This chapter is a project, so reading alone is not enough. Split it into three short blocks and keep the notebook open beside the computer while you build.
- Block 1, 25 minutes. Read coding, programme, programming language and Scratch. Then write the five definitions from memory.
- Block 2, 35 minutes. Learn Sprite, costume, backdrop and stage, then the eight block groups with one example block each.
- Block 3, 40 minutes. Fill one storyboard card of your own, then build the Sprite and backdrop and test one Events block.
- Night before, 10 minutes. Quick recall table, the two mnemonics and the five common mistakes, nothing else.
The book also suggests what to do after the project ends. Make a game or animated story from daily life, taking permission before using anyone's photograph, and try the Pen extension to draw your own shapes and figures.
How These Handwritten Notes Pair with the Chapter Notes and the Kaushal Bodh Book PDF
Also Check: the same chapter is being built in other formats on Collegedunia. Read the book chapter first, keep the typed notes for detail, and use the handwritten pages for the last revision round.
| Resource | Best used for | Open it |
|---|---|---|
| Revision Notes | Typed chapter notes with every Scratch block group and activity explained in full | Animation and Games Class 6 Notes (coming soon) |
| NCERT Book PDF | The official Kaushal Bodh chapter with all original Scratch figures and the storyboard example | Animation and Games Class 6 Book PDF (coming soon) |
| Previous chapter | The project on building working models with simple machines and hand tools | Maker Skills Class 6 Handwritten Notes |
| Next chapter | The project on collecting objects and setting up a museum inside the school | School Museum Class 6 Handwritten Notes |
| Most used in this book | The survey project where a smartphone is used the same way, to identify and record | Biodiversity Register Class 6 Handwritten Notes |
| Start of the book | Project 1, the first Kaushal Bodh project, useful for the project file format | School Kitchen Garden Class 6 Handwritten Notes |
NCERT Handwritten Notes for Class 6 Vocational Education Kaushal Bodh: All Chapters
Related Links: handwritten revision notes for every chapter of the Class 6 Kaushal Bodh textbook, written to the 2026-27 syllabus.
| Chapter | Class 6 Vocational Education Kaushal Bodh Handwritten Notes |
|---|---|
| Chapter 1 | School Kitchen Garden Class 6 Handwritten Notes |
| Chapter 2 | Biodiversity Register Class 6 Handwritten Notes |
| Chapter 3 | Maker Skills Class 6 Handwritten Notes |
| Chapter 4 | Animation and Games Class 6 Handwritten Notes (this page) |
| Chapter 5 | School Museum Class 6 Handwritten Notes |
| Chapter 6 | Cooking without Fire Class 6 Handwritten Notes (coming soon) |
Animation and Games Class 6 Handwritten Notes FAQs
Questions Students Ask About the Animation and Games Notes
Ques. What is Scratch in Class 6 Vocational Education Chapter 4?
Ans. Scratch is the tool used to make animations and games in this project. The book calls it a visual programming language, because you move blocks around instead of writing long programmes in languages that take time to learn. With those blocks you can create animated figures, design games and make your own wallpaper.
Ques. What is coding and what is a programme?
Ans. Coding is how we give instructions to computers and smartphones. When you click a button and the device responds, your click is turned into instructions in a language the machine understands. A programme is a series of instructions given to a computer or a smartphone. The person who writes them is called a programmer.
Ques. What are the eight block groups in Scratch?
Ans. They are Motion, Looks, Sound, Events, Control, Sensing, Operators and Variables. Motion moves the Sprite. Looks changes how it appears. Sound plays music. Events start the code. Control repeats and holds the if else rule. Sensing checks what is happening. Operators do the sums. Variables hold a number that changes, such as the score.
Ques. What is a Sprite and how is it different from a backdrop?
Ans. A Sprite is the character or object that acts in the game, such as the Scratch cat. A backdrop is the picture behind the Sprite, on the stage. A costume is another look of the same Sprite, and changing costumes quickly makes the Sprite seem to move. The stage is the window where the game is played.
Ques. What is a storyboard and why is it made before coding?
Ans. A storyboard helps in planning what will be shown on the screen during a game or animation. It works like a roadmap. You sketch the characters, write how they respond to commands, and show the order of actions. It is made before coding so you do not have to stop and think while building the game.
Ques. How do you create an account on Scratch?
Ans. Log in to the Scratch website to create an account, open the account using an email address belonging to your teacher or a family member, then click the Create button to start making your project. The book asks you to note whether the account gave you any trouble and how it was solved.
Ques. What are the four ways to get a Sprite in Scratch?
Ans. Use an in-built Sprite from the Scratch library, upload an image from the internet, upload a photo you took yourself, or draw your own Sprite in the paint editor. The chapter adds a fifth route as well, where an AI image generator turns a text prompt into an image you can use as a Sprite or a backdrop.
Ques. How do you make an animated birthday card in Scratch?
Ans. Import your friend's picture and use it as a Sprite, then combine Motion, Looks, Control and Events blocks to create the animated message. An Events block starts the card when the green flag is clicked. Add your friend's favourite song with Sound blocks, then save the card and share it.
Ques. What internet safety rules does the Animation and Games chapter give?
Ans. Discuss the precautions with your teacher and friends, then make a list of things to do and not to do and follow it. Ask the teacher before opening a new website, use an adult's email for the account, close the tab if a page looks wrong, and never share your address or phone number. The book also says too much screen time harms mental and physical health, so play outside as well.
Ques. How do you publish and test a game made in Scratch?
Ans. Publish it by clicking the Share button in Scratch, then request other group members to play it. Ask whether there are any issues or bugs that need to be removed for smooth working. Fix the bugs and let them play it once more before you present the game.
Ques. Which jobs are related to the Animation and Games project?
Ans. The book names programmer, software developer, game developer and 3D animator. The chapter asks you to look around, speak to people who do these jobs, and write your own answer in the project file.
Ques. Where can I download the Class 6 Vocational Education Chapter 4 handwritten notes PDF?
Ans. Use the download option at the top of this page. The file is free and printable, runs to 30 handwritten pages, and follows the 2026-27 Kaushal Bodh chapter order, so it can sit open beside the textbook and the computer while you build your own Scratch game.



Comments